目錄
- 01直接生成
- 一、基礎類型
- 1、月牙形數據集合
- 2、方形數據集
- 3、螺旋形數據集合
- 02樣本生成器
- 一、基礎數據集
- 1、點簇形數據集合
- 2、線簇形數據集合
- 3、環形數據集合
- 4、月牙數據集合
- 測試結論

01直接生成
這類方法是利用基本程序軟件包numpy的隨機數產生方法來生成各類用于聚類算法數據集合,也是自行制作輪子的生成方法。
一、基礎類型
1、月牙形數據集合

from headm import *
import numpy as np
pltgif = PlotGIF()
def moon2Data(datanum):
    x1 = linspace(-3, 3, datanum)
    noise = np.random.randn(datanum) * 0.15
    y1 = -square(x1) / 3 + 4.5 + nois
    x2 = linspace(0, 6, datanum)
    noise = np.random.randn(datanum) * 0.15
    y2 = square(x2 - 3) / 3 + 0.5 + noise
    plt.clf()
    plt.axis([-3.5, 6.5, -.5, 5.5])
    plt.scatter(x1, y1, s=10)
    plt.scatter(x2, y2, s=10)
    plt.draw()
    plt.pause(.1)
    pltgif.append(plt)
for _ in range(20):
    moon2Data(300)
pltgif.save(r'd:\temp\GIF1.GIF')
2、方形數據集
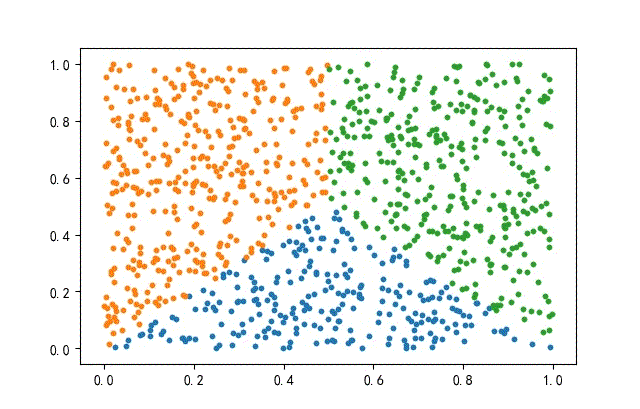
from headm import *
import numpy as np
pltgif = PlotGIF()
def moon2Data(datanum):
    x = np.random.rand(datanum, 2)
    condition1 = x[:, 1] = x[:, 0]
    condition2 = x[:, 1] = (1-x[:, 0])
    index1 = np.where(condition1  condition2)
    x1 = x[index1]
    x = np.delete(x, index1, axis=0)
    index2 = np.where(x[:, 0] = 0.5)
    x2 = x[index2]
    x3 = np.delete(x, index2, axis=0)
    plt.clf()
    plt.scatter(x1[:, 0], x1[:, 1], s=10)
    plt.scatter(x2[:, 0], x2[:, 1], s=10)
    plt.scatter(x3[:, 0], x3[:, 1], s=10)
    plt.draw()
    plt.pause(.1)
    pltgif.append(plt)
for _ in range(20):
    moon2Data(1000)
pltgif.save(r'd:\temp\GIF1.GIF')
3、螺旋形數據集合
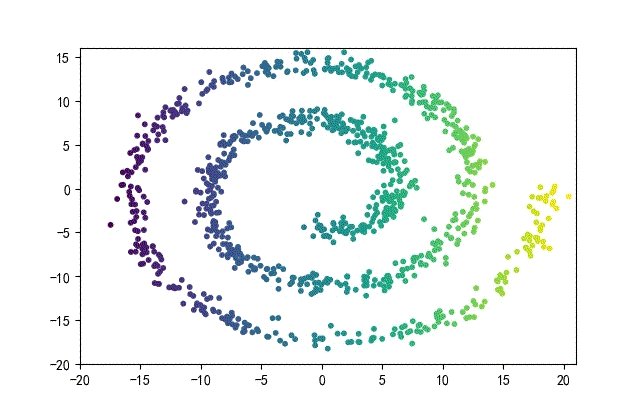
from headm import *
import numpy as np
pltgif = PlotGIF()
def randData(datanum):
    t = 1.5 * pi * (1+3*random.rand(1, datanum))
    x = t * cos(t)
    y = t * sin(t)
    X = concatenate((x,y))
    X += 0.7 * random.randn(2, datanum)
    X = X.T
    norm = plt.Normalize(y.min(), y.max())
    plt.clf()
    plt.scatter(X[:, 0], X[:, 1], s=10, c=norm(X[:,0]), cmap='viridis')
    plt.axis([-20, 21, -20, 16])
    plt.draw()
    plt.pause(.1)
    pltgif.append(plt)
for _ in range(20):
    randData(1000)
pltgif.save(r'd:\temp\GIF1.GIF')
下面的知識螺旋線,沒有隨機移動的點。

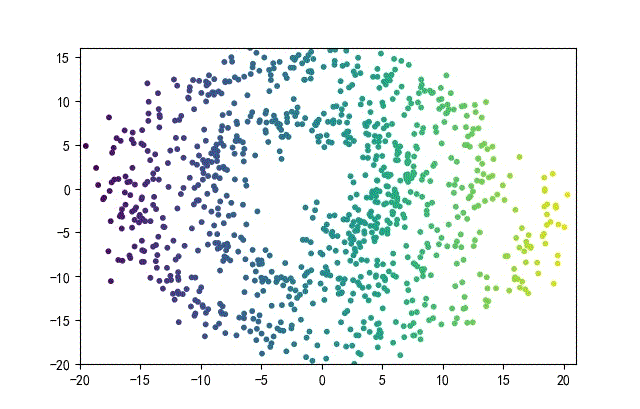
將隨機幅值從原來的0.7增大到1.5,對應的數據集合為:

02樣本生成器
利用sklearn.datasets自帶的樣本生成器來生成相應的數據集合。
一、基礎數據集
1、點簇形數據集合

from headm import *
from sklearn.datasets import make_blobs
pltgif = PlotGIF()
def randData(datanum):
    x1,y1 = make_blobs(n_samples=datanum, n_features=2, centers=3, random_state=random.randint(0, 1000))
    plt.clf()
    plt.scatter(x1[:,0], x1[:, 1], c=y1, s=10)
    plt.draw()
    plt.pause(.1)
    pltgif.append(plt)
for _ in range(20):
    randData(300)
pltgif.save(r'd:\temp\gif1.gif')
繪制三簇點集合,也可以使用如下的語句:
plt.scatter(x1[y1==0][:,0], x1[y1==0][:,1], s=10)
plt.scatter(x1[y1==1][:,0], x1[y1==1][:,1], s=10)
plt.scatter(x1[y1==2][:,0], x1[y1==2][:,1], s=10)
2、線簇形數據集合

生成代碼,只要在前面的x1后面使用旋轉矩陣。
transformation = [[0.60834549, -0.63667341], [-0.40887718, 0.85253229]]
x1 = dot(x1, transformation)
其中轉換矩陣的特征值與特征向量為:
- 特征值:[0.20581711.25506068]
- 特征向量:[[-0.845237740.7015526][-0.53439045-0.71261768]]
3、環形數據集合
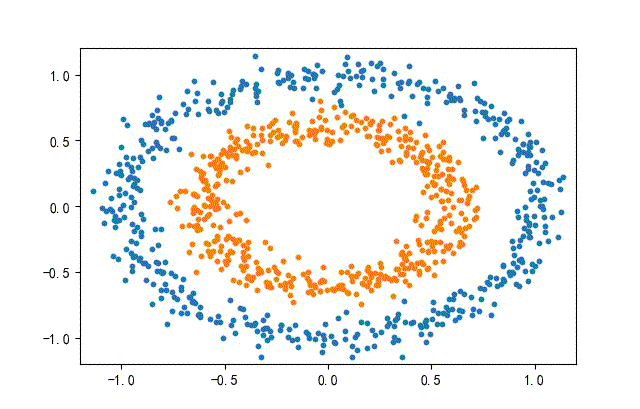
from headm import *
from sklearn.datasets import make_circles
pltgif = PlotGIF()
def randData(datanum):
    x1,y1 = make_circles(n_samples=datanum, noise=0.07, random_state=random.randint(0, 1000), factor=0.6)
    plt.clf()
    plt.scatter(x1[y1==0][:,0], x1[y1==0][:,1], s=10)
    plt.scatter(x1[y1==1][:,0], x1[y1==1][:,1], s=10)
    plt.axis([-1.2, 1.2, -1.2, 1.2])
    plt.draw()
    plt.pause(.1)
    pltgif.append(plt)
for _ in range(20):
    randData(1000)
pltgif.save(r'd:\temp\gif1.gif')
4、月牙數據集合
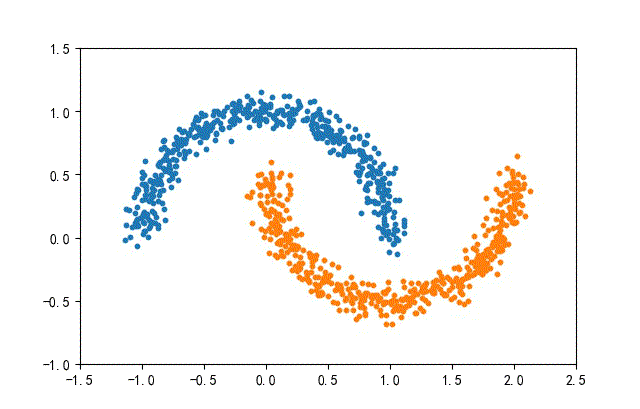
from headm import *
from sklearn.datasets import make_moons
pltgif = PlotGIF()
def randData(datanum):
    x1,y1 = make_moons(n_samples=datanum, noise=0.07, random_state=random.randint(0, 1000))
    plt.clf()
    plt.scatter(x1[y1==0][:,0], x1[y1==0][:,1], s=10)
    plt.scatter(x1[y1==1][:,0], x1[y1==1][:,1], s=10)
    plt.axis([-1.5, 2.5, -1, 1.5])
    plt.draw()
    plt.pause(.1)
    pltgif.append(plt)
for _ in range(20):
    randData(1000)
pltgif.save(r'd:\temp\gif1.gif')
測試結論
sklearn里面還有好多函數來自定制數據,除此之外還可以使用numpy生成,然后通過高級索引進行劃分,最好結合著matplotlib中的cmap來做顏色映射,這樣可以做出好玩又好看的數據集,希望大家以后多多支持腳本之家!
您可能感興趣的文章:- Python機器學習之K-Means聚類實現詳解
- python機器學習實戰之K均值聚類
- 機器學習10大經典算法詳解
- 如何用 Python 處理不平衡數據集
