目錄
- 一、Shutil 模塊
- 1.1 復制文件和文件夾
- 1.2 移動文件和文件夾
- 1.3 刪除文件和文件夾
- 二、遍歷文件
- 三、壓縮文件
- 3.1 創建和添加ZIP文件
- 3.2 讀取ZIP文件
- 3.3 解壓縮ZIP文件
- 四、參考文獻
一、Shutil 模塊
shutil其實也就是shell模塊。其中包含一些函數,可以讓我們在python程序中復制、移動、改名和刪除文件。
1.1 復制文件和文件夾
- shutil.copy(source,destination):將路徑source處的文件復制到路徑destination處的文件夾。如果destination是一個文件名,那么它將作為被復制的新名字
- shutil.copytree(source,destination):將路徑source處的文件夾,包括它的所有文件和子文件夾,復制到路徑destination處的文件夾。
import shutil
import os
current_path = os.getcwd()
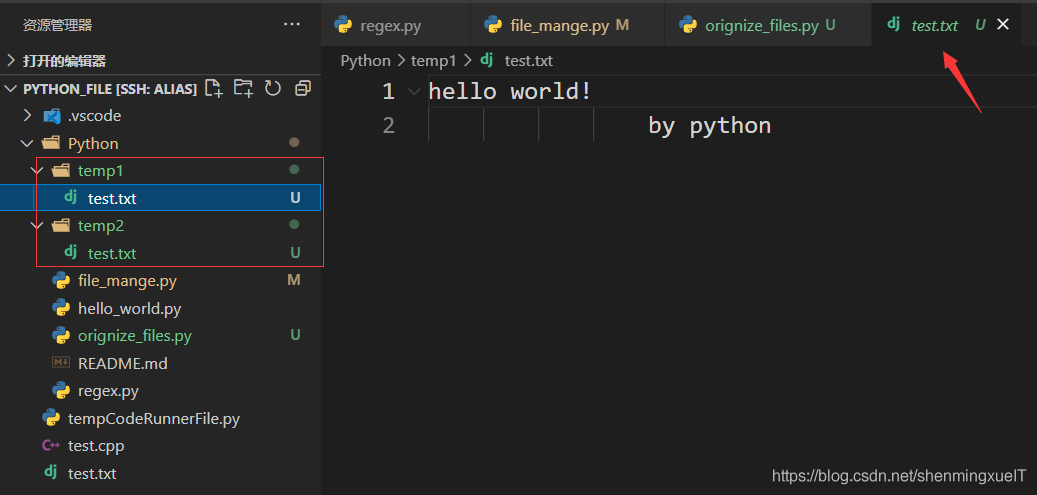
# 拷貝test.txt 文件到temp1文件夾下
shutil.copy(current_path+"/test.txt",current_path+"/Python/temp1")
# 將temp1文件夾內容拷貝到temp2文件夾下,此時會創建temp2文件夾
shutil.copytree(current_path+"/Python/temp1",current_path+"/Python/temp2")
結果:
1.2 移動文件和文件夾
- shutil.move(source,destination):將source處的文件夾移動到路徑destination,并返回新位置的絕對路徑的字符串
注:
如果destination指向一個文件夾,source文件將移動到destination中,并保持原來的文件名;
如果destination指向一個文件,這個文件就會被覆蓋,注意!
如果destination指向一個不存在的文件夾,這個時候source里面的內容會移動到destination,source改名為destination
import shutil
import os
current_path = os.getcwd()
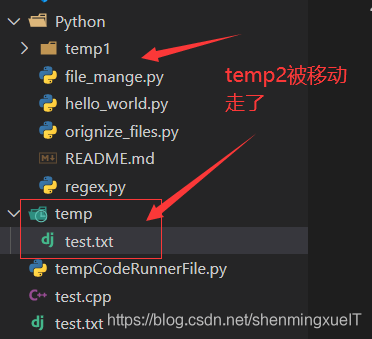
# 將temp2文件夾內的文件拷貝到temp中,并將temp2改名為temp
shutil.move(current_path+"/Python/temp2",current_path+"/temp")
結果:
1.3 刪除文件和文件夾
- os.unlink(path):將刪除path處的文件
- os.rmdir(path):將刪除path處的文件夾。該文件夾必須為空,其中沒有任何文件和文件夾
- shutil.retree(path):將刪除path處的文件夾,它包含的所有文件和文件夾都會被刪除
import shutil
import os
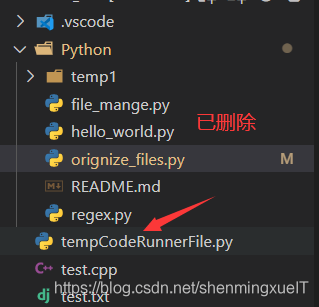
current_path = os.getcwd()
shutil.rmtree(current_path+"/temp")
結果:
二、遍歷文件
os.walk()在循環的每次迭代中,返回三個值:
1.當前文件夾名稱的字符串
2.當前文件夾中子文件夾的字符串的列表
3.當前文件夾中文件的字符串的列表
import shutil
import os

current_path = os.getcwd()
for folder_name,sub_folders,file_names in os.walk(current_path):
    print(folder_name+":")
    # 加載當前文件路徑下的所有子文件
    for sub_folder in sub_folders:
        print("\t"+folder_name+": "+sub_folder+"(dir)")
    for file_name in file_names:
        print("\t"+folder_name+": "+file_name)
輸出(部分):
ubuntu@VM-0-2-ubuntu:~/python_file$ /usr/bin/python3 /home/ubuntu/python_file/Python/orignize_files.py
/home/ubuntu/python_file:
/home/ubuntu/python_file: .vscode(dir)
/home/ubuntu/python_file: Python(dir)
/home/ubuntu/python_file: test.cpp
/home/ubuntu/python_file: test.txt
/home/ubuntu/python_file: tempCodeRunnerFile.py
/home/ubuntu/python_file/.vscode:
/home/ubuntu/python_file/.vscode: db(dir)
/home/ubuntu/python_file/.vscode: .git(dir)
/home/ubuntu/python_file/.vscode: log(dir)
/home/ubuntu/python_file/.vscode: settings.json
/home/ubuntu/python_file/.vscode/db:
/home/ubuntu/python_file/.vscode/db: cpptips.db-wal
/home/ubuntu/python_file/.vscode/db: cpptips.db-shm
/home/ubuntu/python_file/.vscode/db: cpptips.db
/home/ubuntu/python_file/.vscode/.git:
/home/ubuntu/python_file/.vscode/.git: 6eb7a60f73d1a1d9bdf44f2e86d7f4cc_test.cpp
/home/ubuntu/python_file/.vscode/log:
/home/ubuntu/python_file/.vscode/log: cpptips.server.2021-05-19.log
/home/ubuntu/python_file/.vscode/log: cpptips.server.2021-05-16.log
/home/ubuntu/python_file/.vscode/log: cpptips.server.2021-05-17.log
/home/ubuntu/python_file/.vscode/log: cpptips.client.log
/home/ubuntu/python_file/.vscode/log: cpptips.server.log
/home/ubuntu/python_file/Python:
/home/ubuntu/python_file/Python: temp1(dir)
/home/ubuntu/python_file/Python: .git(dir)
/home/ubuntu/python_file/Python: README.md
/home/ubuntu/python_file/Python: hello_world.py
/home/ubuntu/python_file/Python: orignize_files.py
/home/ubuntu/python_file/Python: regex.py
/home/ubuntu/python_file/Python: file_mange.py
.........
.........
.........
三、壓縮文件
利用zipfile模塊中的函數,python程序可以創建和打開ZIP文件。
3.1 創建和添加ZIP文件
想要創建ZIP文件,必須用ZipFile方法創建一個ZipFile對象。ZipFile對象在概念上和File對象相似。
之后,以寫模式打開這個對象。調用write()方法傳入一個路徑,python就會壓縮該路徑所指的文件,將它加到ZIP文件中。write的第一個參數是一個字符串,代表要添加的文件名。第二個參數是”壓縮類型“參數,告訴計算機使用怎樣的算法來壓縮文件。一般來說,ZIP_DEFLATED就可以了。
import zipfile
import os

current_path = os.getcwd()
new_zip = zipfile.ZipFile("newZip","w")
new_zip.write("test.txt",compress_type=zipfile.ZIP_DEFLATED)
new_zip.write("test.cpp",compress_type=zipfile.ZIP_DEFLATED)
結果:
3.2 讀取ZIP文件
當用ZipFile函數打開一個zip文件的時候,會返回一個ZipFile對象。之后調用這個對象的namelist()方法就可以獲得zip里面的壓縮文件列表。
同時這個對象還有一個getinfo()方法,通過傳入一個壓縮文件名,就可以獲得這個文件的一些信息。
import zipfile
import os

current_path = os.getcwd()
new_zip = zipfile.ZipFile("newZip","r")
files = new_zip.namelist()

for file in files:
    info = new_zip.getinfo(file)
    print("filename: "+file)
    print("\tsize: "+str(info.file_size))
    print("\tcompress_size: "+str(info.compress_size))
輸出:
ubuntu@VM-0-2-ubuntu:~/python_file$ /usr/bin/python3 /home/ubuntu/python_file/Python/orignize_files.py
filename: test.txt
size: 26
compress_size: 26
filename: test.cpp
size: 30
compress_size: 28
3.3 解壓縮ZIP文件
ZipFile對象的extractall方法從ZIP文件中解壓縮所有的文件和文件夾,放到當前工作目錄下:
import zipfile
import os

current_path = os.getcwd()
example_zip = zipfile.ZipFile("newZip","r")
# 解壓
example_zip.extractall()
example_zip.close()
結果:

四、參考文獻
AI Sweigart.Python編程快速上手——讓繁瑣工作自動化.人民郵電出版社.2016.07
到此這篇關于python基礎學習之組織文件的文章就介紹到這了,更多相關python組織文件內容請搜索腳本之家以前的文章或繼續瀏覽下面的相關文章希望大家以后多多支持腳本之家!
您可能感興趣的文章:- python基礎之文件處理知識總結
- Python關于OS文件目錄處理的實例分享
- python引入其他文件夾下的py文件具體方法
- 解決python中os.system調用exe文件的問題
- python使用glob檢索文件的操作
- 教你用Python代碼實現合并excel文件
- python3 hdf5文件 遍歷代碼
- Python基礎之元組與文件知識總結
- python提取word文件中的所有圖片
- python可視化hdf5文件的操作
- Python 如何讀取.txt,.md等文本文件
- 教你利用Python破解ZIP或RAR文件密碼
- Python文件基本操作實用指南
- Python爬蟲之m3u8文件里提取小視頻的正確姿勢
- python 如何把classification_report輸出到csv文件
- 用python刪除文件夾中的重復圖片(圖片去重)
- 將Python代碼打包成.exe可執行文件的完整步驟
- Python文件名的匹配之clob庫
