接觸 canvas 也只有一個多月��,第一次完整實現一個游戲流程���,收獲還是挺大的。

射擊游戲截圖
先上 demo:https://littleyljy.github.io/demo/shootgame/
游戲規則
要求玩家控制飛機發射子彈,消滅會移動的怪獸��,如果全部消滅了則游戲成功�����,如果怪獸移動到底部則游戲失敗�����。
- 使用 ← 和 → 操作飛機
- 使用空格(space)進行射擊
- 需有暫停功能
- 多關卡
場景切換
游戲分為幾個場景:
- 開始游戲(.game-intro)
- 游戲中(#canvas)
- 游戲失敗(.game-failed)
- 游戲成功(.game-success)
- 游戲通關(.game-all-success)
- 暫停(.game-stop)
實現場景切換,其實是先把所有場景 display: none , 然后通過 js 控制 data-status 分別為 start 、playing �����、failed �����、success �、all-success �、stop 來實現對應場景 display: block 。
HTML 和 CSS 如下:
<div id="game" data-status="start">
<div class="game-panel">
<section class="game-intro game-ui">
<h1 class="section-title">射擊游戲</h1>
<p class="game-desc">這是一個令人欲罷不能的射擊游戲�����,使用 ← 和 → 操作你的飛機��,使用空格(space)進行射擊�����,使用回車(enter)暫停游戲����。一起來消滅宇宙怪獸吧!</p>
<p class="game-level">當前Level: 1</p>
<button class="js-play button">開始游戲</button>
</section>
<section class="game-failed game-ui">
<h1 class="section-title">游戲結束</h1>
<p class="game-info-text">最終得分: <span class="score"></span></p>
<button class="js-replay button">重新開始</button>
</section>
<section class="game-success game-ui">
<h1 class="section-title">游戲成功</h1>
<p class="game-next-level game-info-text"></p>
<button class="js-next button">繼續游戲</button>
</section>
<section class="game-all-success game-ui">
<h1 class="section-title">通關成功</h1>
<p class="game-next-level game-info-text">你已經成功地防御了怪獸的所有攻擊�����。</p>
<button class="js-replay button">再玩一次</button>
</section>
<section class="game-stop game-ui">
<h1 class="section-title">游戲暫停</h1>
<button class="js-stop button">游戲繼續</button>
</section>
</div>
<div class="game-info game-ui">
<span class="title">分數:</span>
<span class="score"></span>
</div>
<canvas id="canvas" width="700" height="600">
<!-- 動畫畫板 -->
</canvas>
</div>
#game{
  width: 700px;
  height: 600px;
  position: relative;
  left: 50%;
  top: 40px;
  margin: 0 0 0 -350px;
  background: linear-gradient(-180deg, #040024 0%, #07165C 97%);
}

.game-ui{
  display: none;
  padding: 55px;
  box-sizing: border-box;
    height: 100%;
}

[data-status="start"] .game-intro {
  display: block;
  padding-top: 180px;
  background: url(./img/bg.png) no-repeat 430px 180px;
  background-size: 200px;
}

[data-status="playing"] .game-info {
  display: block;
  position: absolute;
  top:0;
  left:0;
  padding:20px;
}

[data-status="failed"] .game-failed,
[data-status="success"] .game-success,
[data-status="all-success"] .game-all-success,
[data-status="stop"] .game-stop{
  display: block;
  padding-top: 180px;
  background: url(./img/bg-end.png) no-repeat 380px 190px;
  background-size: 250px;
}
面向對象
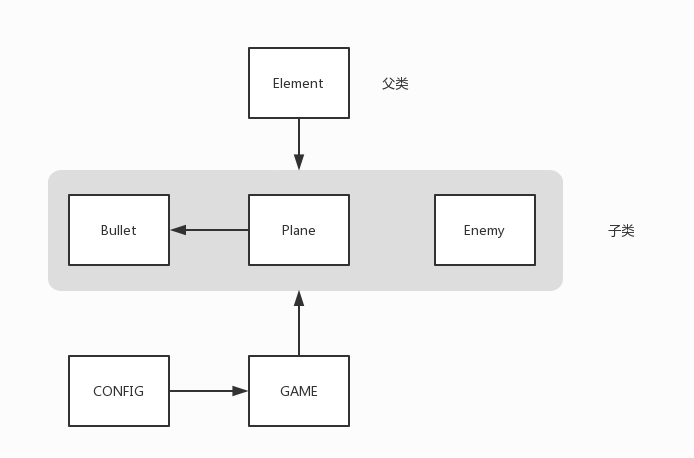
整個游戲可以把怪獸(Enemy)��、飛機(Plane)��、子彈(Bullet)都當作對象,另外還有配置對象(CONFIG)和控制游戲邏輯的游戲對象(GAME)�����。
游戲相關配置
/**
  * 游戲相關配置
  * @type {Object}
  */
var CONFIG = {
  status: 'start', // 游戲開始默認為開始中
  level: 1, // 游戲默認等級
  totalLevel: 6, // 總共6關
  numPerLine: 7, // 游戲默認每行多少個怪獸
  canvasPadding: 30, // 默認畫布的間隔
  bulletSize: 10, // 默認子彈長度
  bulletSpeed: 10, // 默認子彈的移動速度
  enemySpeed: 2, // 默認敵人移動距離
  enemySize: 50, // 默認敵人的尺寸
  enemyGap: 10,  // 默認敵人之間的間距
  enemyIcon: './img/enemy.png', // 怪獸的圖像
  enemyBoomIcon: './img/boom.png', // 怪獸死亡的圖像
  enemyDirection: 'right', // 默認敵人一開始往右移動
  planeSpeed: 5, // 默認飛機每一步移動的距離
  planeSize: {
    width: 60,
    height: 100
  }, // 默認飛機的尺寸,
  planeIcon: './img/plane.png'
};
定義父類
因為怪獸(Enemy)��、飛機(Plane)����、子彈(Bullet)都有相同的 x, y, size, speed 屬性和 move() 方法���,所以可以定義一個父類 Element��,通過子類繼承父類的方式實現�����。
/*父類:包含x y speed move() draw()*/
var Element = function (opts) {
this.opts = opts || {};
//設置坐標、尺寸���、速度
this.x = opts.x;
this.y = opts.y;
this.size = opts.size;
this.speed = opts.speed;
};
Element.prototype.move = function (x, y) {
var addX = x || 0;
var addY = y || 0;
this.x += addX;
this.y += addY;
};
//繼承原型的函數
function inheritPrototype(subType, superType) {
var proto = Object.create(superType.prototype);
proto.constructor = subType;
subType.prototype = proto;
}
move(x, y) 方法根據傳入的 (x, y) 值自疊加�����。
定義怪獸
怪獸包含特有屬性:怪獸狀態�、圖像、控制爆炸狀態持續的 boomCount ���,和 draw()、down()���、direction()、booming() 方法����。
/*敵人*/
var Enemy = function (opts) {
this.opts = opts || {};
//調用父類屬性
Element.call(this, opts);
//特有屬性狀態和圖像
this.status = 'normal';//normal����、booming���、noomed
this.enemyIcon = opts.enemyIcon;
this.enemyBoomIcon = opts.enemyBoomIcon;
this.boomCount = 0;
};
//繼承Element方法
inheritPrototype(Enemy, Element);
//方法:繪制敵人
Enemy.prototype.draw = function () {
if (this.enemyIcon && this.enemyBoomIcon) {
switch (this.status) {
case 'normal':
var enemyIcon = new Image();
enemyIcon.src = this.enemyIcon;
ctx.drawImage(enemyIcon, this.x, this.y, this.size, this.size);
break;
case 'booming':
var enemyBoomIcon = new Image();
enemyBoomIcon.src = this.enemyBoomIcon;
ctx.drawImage(enemyBoomIcon, this.x, this.y, this.size, this.size);
break;
case 'boomed':
ctx.clearRect(this.x, this.y, this.size, this.size);
break;
default:
break;
}
}
return this;
};
//方法:down 向下移動
Enemy.prototype.down = function () {
this.move(0, this.size);
return this;
};
//方法:左右移動
Enemy.prototype.direction = function (direction) {
if (direction === 'right') {
this.move(this.speed, 0);
} else {
this.move(-this.speed, 0);
}
return this;
};
//方法:敵人爆炸
Enemy.prototype.booming = function () {
this.status = 'booming';
this.boomCount += 1;
if (this.boomCount > 4) {
this.status = 'boomed';
}
return this;
}
- draw() 主要是根據怪獸的狀態繪制不同的圖像�����。
- down() 調用父類 move() 方法��,傳入 y 值控制怪獸向下移動。
- direction() 根據傳入的方向值控制左/右移動。
- booming() 讓爆炸狀態持續4幀���,4幀后再消失。
定義子彈
子彈有 fly() ���、draw() 方法。
/*子彈*/
var Bullet = function (opts) {
    this.opts = opts || {};
    Element.call(this, opts);
};

inheritPrototype(Bullet, Element);

//方法:讓子彈飛
Bullet.prototype.fly = function () {
    this.move(0, -this.speed);
    return this;
};

//方法:繪制子彈
Bullet.prototype.draw = function () {
    ctx.beginPath();
    ctx.strokeStyle = '#fff';
    ctx.moveTo(this.x, this.y);
    ctx.lineTo(this.x, this.y - CONFIG.bulletSize);
    ctx.closePath();
    ctx.stroke();
    return this;
};
- fly() 調用父類 move() 方法����,傳入 y 值控制子彈向上移動。
- draw() 因為子彈其實就是一條長度為 10 的直線,通過繪制路徑的方式畫出子彈���。
定義飛機
飛機對象包含特有屬性:狀態、寬高、圖像���、橫坐標最大最小值,有 hasHit()、draw()、direction()、shoot()�����、drawBullets() 方法�。
/*飛機*/
var Plane = function (opts) {
    this.opts = opts || {};
    Element.call(this, opts);

    //特有屬性狀態和圖像
    this.status = 'normal';
    this.width = opts.width;
    this.height = opts.height;
    this.planeIcon = opts.planeIcon;
    this.minX = opts.minX;
    this.maxX = opts.maxX;
    //子彈相關
    this.bullets = [];
    this.bulletSpeed = opts.bulletSpeed || CONFIG.bulletSpeed;
    this.bulletSize = opts.bulletSize || CONFIG.bulletSize;
};
//繼承Element方法
inheritPrototype(Plane, Element);

//方法:子彈擊中目標
Plane.prototype.hasHit = function (enemy) {
    var bullets = this.bullets;
    for (var i = bullets.length - 1; i >= 0; i--) {
        var bullet = bullets[i];
        var isHitPosX = (enemy.x < bullet.x) && (bullet.x < (enemy.x + enemy.size));
        var isHitPosY = (enemy.y < bullet.y) && (bullet.y < (enemy.y + enemy.size));
        if (isHitPosX && isHitPosY) {
            this.bullets.splice(i, 1);
            return true;
        }
    }
    return false;
};

//方法:繪制飛機
Plane.prototype.draw = function () {
    this.drawBullets();
    var planeIcon = new Image();
    planeIcon.src = this.planeIcon;
    ctx.drawImage(planeIcon, this.x, this.y, this.width, this.height);
    return this;
};
//方法:飛機方向
Plane.prototype.direction = function (direction) {
    var speed = this.speed;
    var planeSpeed;
    if (direction === 'left') {
        planeSpeed = this.x < this.minX ? 0 : -speed;
    } else {
        planeSpeed = this.x > this.maxX ? 0 : speed;
    }
    console.log('planeSpeed:', planeSpeed);
    console.log('this.x:', this.x);
    console.log('this.minX:', this.minX);
    console.log('this.maxX:', this.maxX);
    this.move(planeSpeed, 0);
    return this;//方便鏈式調用
};
//方法:發射子彈
Plane.prototype.shoot = function () {
    var bulletPosX = this.x + this.width / 2;
    this.bullets.push(new Bullet({
        x: bulletPosX,
        y: this.y,
        size: this.bulletSize,
        speed: this.bulletSpeed
    }));
    return this;
};
//方法:繪制子彈
Plane.prototype.drawBullets = function () {
    var bullets = this.bullets;
    var i = bullets.length;
    while (i--) {
        var bullet = bullets[i];
        bullet.fly();
        if (bullet.y <= 0) {
            bullets.splice(i, 1);
        }
        bullet.draw();
    }
};
- hasHit() 判斷飛機發射的子彈是否擊中怪獸,主要是判斷子彈的橫坐標是否在[怪獸橫坐標,怪獸橫坐標+怪獸高度]范圍內,同時子彈的縱坐標在[怪獸縱坐標,怪獸縱坐標+怪獸寬度]范圍內�,擊中返回 true���,并移除該子彈�。
- draw() 繪制子彈和飛機����。
- direction() 因為飛機移動范圍有左右邊界,需要判斷飛機橫坐標是否到達邊界��,如果到達邊界 planeSpeed 為 0��,不再移動����。
- shoot() 創建子彈對象���,保存到 bullets 數組����,子彈橫坐標為飛機橫坐標加上飛機寬度的一半。
- drawBullets() 繪制子彈,從數組最后往回遍歷子彈對象數組�,調用子彈 fly() 方法,如果子彈向上飛出屏幕��,則移除這顆子彈�����。
定義鍵盤事件
鍵盤事件有以下幾種狀態:
- keydown:用戶在鍵盤上按下某按鍵時發生�����。一直按著某按鍵則會不斷觸發(opera 瀏覽器除外)��。
- keypress:用戶按下一個按鍵,并產生一個字符時發生(也就是不管類似 shift���、alt、ctrl 之類的鍵��,就是說用戶按了一個能在屏幕上輸出字符的按鍵 keypress 事件才會觸發)��。一直按著某按鍵則會不斷觸發����。
- keyup:用戶釋放某一個按鍵是觸發����。
因為飛機需要按下左鍵(keyCode=37)右鍵(keyCode=39)時(keydown)一直移動,釋放時 keyup 不移動。按下空格(keyCode=32)或上方向鍵(keyCode=38)時(keydown)發射子彈�,釋放時 keyup 停止發射�����。另外按下回車鍵(keyCode=13)暫停游戲。所以,需要定義一個 KeyBoard 對象監聽 onkeydown 和 onkeyup 是否按下或釋放某個鍵。
因為左右鍵是矛盾的���,為保險起見,按下左鍵時需要把右鍵 設為 false�。右鍵同理。
//鍵盤事件
var KeyBoard = function () {
  document.onkeydown = this.keydown.bind(this);
  document.onkeyup = this.keyup.bind(this);
};
//KeyBoard對象
KeyBoard.prototype = {
  pressedLeft: false,
  pressedRight: false,
  pressedUp: false,
  heldLeft: false,
  heldRight: false,
  pressedSpace: false,
  pressedEnter: false,
  keydown: function (e) {
    var key = e.keyCode;
    switch (key) {
      case 32://空格-發射子彈
        this.pressedSpace = true;
        break;
      case 37://左方向鍵
        this.pressedLeft = true;
        this.heldLeft = true;
        this.pressedRight = false;
        this.heldRight = false;
        break;
      case 38://上方向鍵-發射子彈
        this.pressedUp = true;
        break;
      case 39://右方向鍵
        this.pressedLeft = false;
        this.heldLeft = false;
        this.pressedRight = true;
        this.heldRight = true;
        break;
      case 13://回車鍵-暫停游戲
        this.pressedEnter = true;
        break;
    }
  },
  keyup: function (e) {
    var key = e.keyCode;
    switch (key) {
      case 32:
        this.pressedSpace = false;
        break;
      case 37:
        this.heldLeft = false;
        this.pressedLeft = false;
        break;
      case 38:
        this.pressedUp = false;
        break;
      case 39:
        this.heldRight = false;
        this.pressedRight = false;
        break;
      case 13:
        this.pressedEnter = false;
        break;
    }
  }
};
游戲邏輯
游戲對象(GAME)包含了整個游戲的邏輯�,包括init(初始化)�����、bindEvent(綁定按鈕)、setStatus(更新游戲狀態)���、play(游戲中)、stop(暫停)����、end(結束)等�����,在此不展開描述。也包含了生成怪獸��、繪制游戲元素等函數����。
// 整個游戲對象
var GAME = {
  //一系列邏輯函數
  //游戲元素函數
}
1、初始化
初始化函數主要是定義飛機初始坐標���、飛機移動范圍、怪獸移動范圍��,以及初始化分數����、怪獸數組,創建 KeyBoard 對象����,只執行一次����。
/**
   * 初始化函數,這個函數只執行一次
   * @param  {object} opts
   * @return {[type]}      [description]
   */
init: function (opts) {
    //設置opts
    var opts = Object.assign({}, opts, CONFIG);//合并所有參數
    this.opts = opts;
    this.status = 'start';
    //計算飛機對象初始坐標
    this.planePosX = canvasWidth / 2 - opts.planeSize.width;
    this.planePosY = canvasHeight - opts.planeSize.height - opts.canvasPadding;
    //飛機極限坐標
    this.planeMinX = opts.canvasPadding;
    this.planeMaxX = canvasWidth - opts.canvasPadding - opts.planeSize.width;
    //計算敵人移動區域
    this.enemyMinX = opts.canvasPadding;
    this.enemyMaxX = canvasWidth - opts.canvasPadding - opts.enemySize;

    //分數設置為0
    this.score = 0;
    this.enemies = [];
    this.keyBoard = new KeyBoard();

    this.bindEvent();
    this.renderLevel();
  },
2��、綁定按鈕事件
因為幾個游戲場景中包含開始游戲(playBtn)、重新開始(replayBtn)、下一關游戲(nextBtn)��、暫停游戲繼續(stopBtn)幾個按鈕���。我們需要給不同按鈕執行不同事件���。
首先定義 var self = this; 的原因是 this 的用法����。在 bindEvent 函數中, this 指向 GAME 對象��,而在 playBtn.onclick = function () {}; 中 this 指向了 playBtn ���,這顯然不是我們希望的,因為 playBtn 沒有 play() 事件����,GAME 對象中才有��。因此需要把GAME 對象賦值給一個變量 self ,然后才能在 playBtn.onclick = function () {}; 中調用 play() 事件���。
需要注意的是 replayBtn 按鈕在闖關失敗和通關場景都有出現,因此獲取的是所有 .js-replay 的集合�����。然后 forEach 遍歷每個 replayBtn 按鈕��,重置關卡和分數���,調用 play() 事件。
bindEvent: function () {
    var self = this;
    var playBtn = document.querySelector('.js-play');
    var replayBtn = document.querySelectorAll('.js-replay');
    var nextBtn = document.querySelector('.js-next');
    var stopBtn = document.querySelector('.js-stop');
    // 開始游戲按鈕綁定
    playBtn.onclick = function () {
      self.play();
    };
    //重新開始游戲按鈕綁定
    replayBtn.forEach(function (e) {
      e.onclick = function () {
        self.opts.level = 1;
        self.play();
        self.score = 0;
        totalScoreText.innerText = self.score;
      };
    });
    // 下一關游戲按鈕綁定
    nextBtn.onclick = function () {
      self.opts.level += 1;
      self.play();
    };
    // 暫停游戲繼續按鈕綁定
    stopBtn.onclick = function () {
      self.setStatus('playing');
      self.updateElement();
    };
  },
3、生成飛機
createPlane: function () {
  var opts = this.opts;
  this.plane = new Plane({
      x: this.planePosX,
      y: this.planePosY,
      width: opts.planeSize.width,
      height: opts.planeSize.height,
      minX: this.planeMinX,
      speed: opts.planeSpeed,
      maxX: this.planeMaxX,
      planeIcon: opts.planeIcon
    });
}
4、生成一組怪獸
因為怪獸都是成組出現的����,每一關的怪獸數量也不同���,兩個 for 循環的作用就是生成一行怪獸���,根據關數(level)增加 level 行怪獸�?���;蛘咴黾庸肢F的速度(speed: speed + i,)來提高每一關難度等。
//生成敵人
  createEnemy: function (enemyType) {
    var opts = this.opts;
    var level = opts.level;
    var enemies = this.enemies;
    var numPerLine = opts.numPerLine;
    var padding = opts.canvasPadding;
    var gap = opts.enemyGap;
    var size = opts.enemySize;
    var speed = opts.enemySpeed;
    //每升級一關敵人增加一行
    for (var i = 0; i < level; i++) {
      for (var j = 0; j < numPerLine; j++) {
      //綜合元素的參數
        var initOpt = {
          x: padding + j * (size + gap),
          y: padding + i * (size + gap),
          size: size,
          speed: speed,
          status: enemyType,
          enemyIcon: opts.enemyIcon,
          enemyBoomIcon: opts.enemyBoomIcon
        };
        enemies.push(new Enemy(initOpt));
      }
    }
    return enemies;
  },
5、更新怪獸
獲取怪獸數組的 x 值,判斷是否到達畫布邊界��,如果到達邊界則怪獸向下移動�。同時也要監聽怪獸狀態,正常狀態下的怪獸是否被擊中,爆炸狀態下的怪獸�,消失的怪獸要從數組剔除�����,同時得分。
//更新敵人狀態
  updateEnemeis: function () {
    var opts = this.opts;
    var plane = this.plane;
    var enemies = this.enemies;
    var i = enemies.length;
    var isFall = false;//敵人下落
    var enemiesX = getHorizontalBoundary(enemies);
    if (enemiesX.minX < this.enemyMinX || enemiesX.maxX >= this.enemyMaxX) {
      console.log('enemiesX.minX', enemiesX.minX);
      console.log('enemiesX.maxX', enemiesX.maxX);
      opts.enemyDirection = opts.enemyDirection === 'right' ? 'left' : 'right';
      console.log('opts.enemyDirection', opts.enemyDirection);
      isFall = true;
    }
    //循環更新敵人
    while (i--) {
      var enemy = enemies[i];
      if (isFall) {
        enemy.down();
      }
      enemy.direction(opts.enemyDirection);
      switch (enemy.status) {
        case 'normal':
          if (plane.hasHit(enemy)) {
            enemy.booming();
          }
          break;
        case 'booming':
          enemy.booming();
          break;
        case 'boomed':
          enemies.splice(i, 1);
          this.score += 1;
          break;
        default:
          break;
      }
    }
  },
getHorizontalBoundary 函數的作用是遍歷數組每個元素的 x 值,篩選出更大或更小的值����,從而獲得數組最大和最小的 x 值����。
//獲取數組橫向邊界
function getHorizontalBoundary(array) {
  var min, max;
  array.forEach(function (item) {
    if (!min && !max) {
      min = item.x;
      max = item.x;
    } else {
      if (item.x < min) {
        min = item.x;
      }
      if (item.x > max) {
        max = item.x;
      }
    }
  });
  return {
    minX: min,
    maxX: max
  }
}
6����、更新鍵盤面板
按下回車鍵執行 stop() 函數,按下左鍵執行飛機左移�����,按下右鍵執行飛機右移�,按下空格執行飛機發射子彈�,為了不讓子彈連成一條直線,在這里設置 keyBoard.pressedUp 和 keyBoard.pressedSpace 為 false���。
  updatePanel: function () {
    var plane = this.plane;
    var keyBoard = this.keyBoard;
    if (keyBoard.pressedEnter) {
      this.stop();
      return;
    }
    if (keyBoard.pressedLeft || keyBoard.heldLeft) {
      plane.direction('left');
    }
    if (keyBoard.pressedRight || keyBoard.heldRight) {
      plane.direction('right');
    }
    if (keyBoard.pressedUp || keyBoard.pressedSpace) {
      keyBoard.pressedUp = false;
      keyBoard.pressedSpace = false;
      plane.shoot();
    }
  },
7、繪制所有元素
draw: function () {
    this.renderScore();
    this.plane.draw();
    this.enemies.forEach(function (enemy) {
      //console.log('draw:this.enemy',enemy);
      enemy.draw();
    });
  },
8���、更新所有元素
首先判斷怪獸數組長度是否為 0 ,為 0 且 level 等于 totalLevel 說明通關����,否則顯示下一關游戲準備畫面�����;如果怪獸數組 y 坐標大于飛機 y 坐標加怪獸高度,顯示游戲失敗��。
canvas 動畫的原理就是不斷繪制���、更新�����、清除畫布���。
游戲暫停的原理就是阻止 requestAnimationFrame() 函數執行����,但不重置元素。因此判斷 status 的狀態為 stop 時跳出函數��。
  //更新所有元素狀態
  updateElement: function () {
    var self = this;
    var opts = this.opts;
    var enemies = this.enemies;

    if (enemies.length === 0) {
      if (opts.level === opts.totalLevel) {
        this.end('all-success');
      } else {
        this.end('success');
      }
      return;
    }
    if (enemies[enemies.length - 1].y >= this.planePosY - opts.enemySize) {
      this.end('failed');
      return;
    }
    //清理畫布
    ctx.clearRect(0, 0, canvasWidth, canvasHeight);
    //繪制畫布
    this.draw();
    //更新元素狀態
    this.updatePanel();
    this.updateEnemeis();

    //不斷循環updateElement
    requestAnimationFrame(function () {
      if(self.status === 'stop'){
        return;
      }else{
        self.updateElement();
      }
    });
  },
寫在最后
通過以上幾個步驟�,游戲的基本功能就完成了�,其他一些游戲流程控制,包括開始�����、結束�����、得分計算等在此就不敘述了�。
可以優化的地方:在按住空格鍵的時候���,可以連續發射子彈�����。但是�����,這時再按一下方向鍵,發現無法再發射子彈了����。最好是能移動的時候����,也能保持著子彈的發射����。
canvas 做游戲還是比較有趣的,另外還可以把這個游戲加以擴展�����,改成手機版�,畫布尺寸通過獲取屏幕寬高確定��,鍵盤部分改成觸摸事件(touchstart�����、touchmove、touchend),怪獸出現方式也可以改成從屏幕頂端隨機下落�����,怪獸增加血量(如射擊4次才消失)等�。
下載地址:https://github.com/littleyljy/shoot
以上就是本文的全部內容,希望對大家的學習有所幫助,也希望大家多多支持腳本之家����。
