目錄
- 實踐1.根據用戶的輸入判斷用戶輸入的是哪個數字,執行相應動作
- 實踐2.打印一個如下的水果菜單
- 實踐3.開發nginx啟動腳本
- 實踐4.開發跳板機
#前言:這篇我們接著寫shell的另外一個條件語句case,上篇講解了if條件語句。case條件語句我們常用于實現系統服務啟動腳本等場景,case條件語句也相當于if條件語句多分支結構,多個選擇,case看起來更規范和易讀
#case條件語句的語法格式
case "變量" in
 值1)
 指令1...
 ;;
 值2)
 指令2...
 ;;
 *)
 指令3...
esac
#說明:當變量的值等于1時,那么就會相應的執行指令1的相關命令輸出,值等于2時就執行指令2的命令,以此類推,如果都不符合的話,則執行*后面的指令,要注意內容的縮進距離
#簡單記憶
case "找工作條件" in
 給的錢多)
 給你工作...
 ;;
 給股份)
 給你工作...
 ;;
 有發展前景)
 可以試試...
 ;;
 *)
 bye bye !!
esac
實踐1.根據用戶的輸入判斷用戶輸入的是哪個數字,執行相應動作
#如果用戶輸入的是1-9的任意一個數字,則輸出對應輸入的數字,如果是別的字符,則提示輸出不正確并退出程序
[root@shell scripts]# cat num.sh
#!/bin/bash

#create by guoke
#function number input

read -p "please input a number:" num #打印信息提示用戶輸入,輸入信息賦值給num變量

case "$num" in
 1)
 echo "The num you input is 1"
 ;;
 [2-5])
   echo "The num you input is 2-5"
 ;;
 [6-9])
   echo "The num you input is 6-9"
 ;;
 *)
   echo "please input number[1-9] int"
    exit;
esac
#說明:使用read讀取用戶輸入的數據,然后使用case條件語句進行判斷,根據用戶輸入的值執行相關的操作
#執行效果
[root@shell scripts]# sh num.sh
please input a number:1
The num you input is 1
[root@shell scripts]# sh num.sh
please input a number:3
The num you input is 2-5
[root@shell scripts]# sh num.sh
please input a number:4
The num you input is 2-5
[root@shell scripts]# sh num.sh
please input a number:8
The num you input is 6-9
[root@shell scripts]# sh num.sh
please input a number:a
please input number[1-9] int
實踐2.打印一個如下的水果菜單
(1) banana
(2) apple
(3)orange
(4) cherry
#腳本編寫
[root@shell scripts]# cat menu.sh
#!/bin/bash

#create by guoke
#function print menu

RED_COLOR='\E[1;31m'
GREEN_COLOR='\E[1;32m'
YELLOW_COLOR='\E[1;33m'
BLUE_COLOR='\E[1;34m'
RES='\E[0m'

echo ' #使用echo打印菜單
#############################
 1.banana
 2.apple
 3.pear
 4.cherry
#############################
'

read -p "please select a num:" num

case "$num" in
 1)
   echo -e "${YELLOW_COLOR} banana ${RES}"
 ;;
 2)
   echo -e "${RED_COLOR} apple ${RES}"
 ;;
 3)
   echo -e "${GREEN_COLOR} pear ${RES}"
 ;;
 4)
   echo -e "${BLUE_COLOR} cherry ${RES}"
 ;;
 *)
   echo "please input {1|2|3|4}"
esac
#說明:定義顏色,使用read讀取用戶輸入的數據,然后使用case條件語句進行判斷,根據用戶輸入的值執行相關的操作,給用戶輸入的水果添加顏色
#擴展:輸出菜單的另外種方式
cat-EOF
===============================
 1.banana
 2.apple
 3.pear
 4.cherry
===============================
EOF
#執行效果
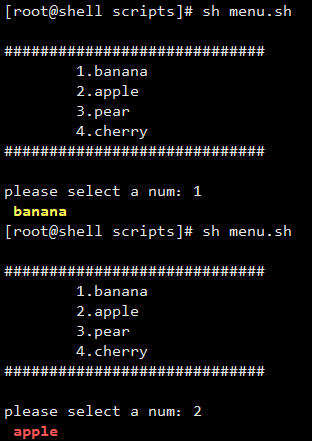
#如果輸入不正確或者不輸入的話就打印幫助
[root@shell scripts]# sh menu.sh

#############################
1.banana
2.apple
3.pear
4.cherry
#############################

please select a num:
please input {1|2|3|4}
#輸入選項中的數字,打印相關信息
實踐3.開發nginx啟動腳本
#主要思路:
#1.主要通過判斷nginx的pid文件有無存在,通過返回值查看有沒有運行
#2.通過case語句獲取參數進行判斷
#3.引入系統函數庫functions中的action函數
#4.對函數及命令運行的返回值進行處理
#5.設置開機自啟動
#附上nginx編譯安裝過程
#!/bin/bash
yum install gcc pcre pcre-devel wget openssl openssl-devel.x86_64 -y
mkdir -p /home/demo/tools
cd /home/demo/tools/
wget -q http://nginx.org/download/nginx-1.6.3.tar.gz
useradd nginx -s /sbin/nologin -M
tar xf nginx-1.6.3.tar.gz
cd nginx-1.6.3/
./configure --user=nginx --group=nginx --prefix=/application/nginx --with-http_stub_status_module --with-http_ssl_module
make
make install
ln -s /application/nginx-1.6.3 /application/nginx/ #做軟連接
/application/nginx/sbin/nginx -t #檢查語法
/application/nginx/sbin/nginx #啟動服務
#腳本編寫
[root@shell init.d]# chmod +x /etc/init.d/nginxd
[root@shell init.d]# cat nginxd
#!/bin/bash
#chkconfig: 2345 40 98 #設定2345級別,開機第40位啟動腳本,關機第98位關閉腳本

#create by guoke
#email:1075792988@qq.com
#function nginx start scripts

[ -f /etc/init.d/functions ]  source /etc/init.d/functions #引入系統函數庫

PIDFILE=/application/nginx/logs/nginx.pid #定義PID文件路徑
NGINX=/application/nginx/sbin/nginx #定義啟動命令路徑

value(){ #定義返回值函數
 RETVAL=$?
 if [ $RETVAL -eq 0 ];then
   action "Nginx is $1" /bin/true
 else
   action "Nginx is $1" /bin/true
 fi
}

start(){ #定義啟動函數
 if [ -f $PIDFILE ];then #判斷PIDFILE存不存在,存在就打印運行,否則就啟動
   echo "Nginx is running"
 else
   $NGINX
   value start #調用返回值函數
 fi
}

stop(){ #定義停止函數
 if [ ! -f $PIDFILE ];then #也是通過判斷PID文件是否存在然后進行相關操作
   echo "Nginx not running"
 else
   $NGINX -s stop
   value stop
 fi
}

reload(){ #定義重啟函數
 if [ ! -f $PIDFILE ];then
   echo "not open $PIDFILE no such directory"
 else
   $nginx -s reload
   value reload
 fi
}

case "$1" in #使用case接收腳本傳參的字符串
 start) #如果第一個參數為start,調用start函數
   start
 ;;
 stop) #如果第一個參數為stop,調用stop函數
   stop
 ;;
 reload)
   stop
   sleep 1
   start
 ;;
 *)
   echo "USAGE:$0 {stop|start|reload}"
   exit 1
esac
#執行效果
[root@shell init.d]# sh nginx stop
Nginx is stop [ OK ]
[root@shell init.d]# sh nginx start
Nginx is start [ OK ]
[root@shell init.d]# sh nginx reload
Nginx is stop [ OK ]
Nginx is start [ OK ]
實踐4.開發跳板機
#要求用戶登錄到跳板機后只能執行管理員給定的選項動作,不能中斷腳本而到跳板機服務器上執行任何系統命令
#思路
1.首先做好ssh key驗證登錄
2.實現遠程連接菜單選擇腳本
3.利用Linux信號防止用戶在跳板機上操作
4.用戶登錄后就調用腳本
#操作過程
3.1.做ssh免密鑰登錄,發送到各個主機,如果機器多的話可以使用腳本進行循環發送
[demo@shell ~]$ ssh-keygen -t dsa -P "" -f ~/.ssh/id_dsa
Generating public/private dsa key pair.
Enter file in which to save the key (/home/demo/.ssh/id_dsa):
Created directory '/home/demo/.ssh'.
Your identification has been saved in /home/demo/.ssh/id_dsa.
Your public key has been saved in /home/demo/.ssh/id_dsa.pub.
The key fingerprint is:
SHA256:BTFfcC2hMKBzuZeUYylC3qgza7z4X6j3RBlwq8Beoak demo@shell
The key's randomart image is:
+---[DSA 1024]----+
| + o.*...+o |
| . = B o O +. . |
| = B B * + . |
| o + = B + |
|E = . + S |
| . + o .  |
| + . o  |
| o o.o  |
|..+o...  |
+----[SHA256]-----+
#命令說明:一鍵生成密鑰,不用按回車。-t:指定要創建的密鑰類型,-P:提供舊密碼,空表示不需要密碼,-f:指定位置

#將公鑰拷貝到其他服務器的demo用戶
[demo@shell ~]$ ssh-copy-id -i .ssh/id_dsa.pub "demo@192.168.86.129"
[demo@shell ~]$ ssh-copy-id -i .ssh/id_dsa.pub "demo@192.168.86.130"
[demo@shell ~]$ ssh-copy-id -i .ssh/id_dsa.pub demo@192.168.86.131
#3.2.編寫腳本
[root@shell scripts]# cat tiaobanji.sh
#!/bin/bash

trapper(){ #定義屏蔽信號函數
 trap '' INT QUIT TSTP TERM HUB
}

menu(){ #定義菜單列表函數
 cat-EOF #加-后面的EOF就可以不用頂格
==============Host List==============
 1) 192.168.86.129
 2) 192.168.86.130
 3) 192.168.86.131
 4) 192.168.86.132
 5) exit
=====================================
 EOF
}

USER=demo

host(){ #定義主機列表函數
 case "$1" in
 1)
 ssh $USER@192.168.86.129
 ;;
 2)
 ssh $USER@192.168.86.130
 ;;
 3)
 ssh $USER@192.168.86.131
 ;;
 4)
 ssh $USER@192.168.86.132
 ;;
 5)
 exit
esac
}

main(){ #定義主函數
 while : #while循環,一直循環
 do
 trapper #調用trapper函數
 clear #清屏
 menu #調用菜單函數
 read -p "please select a num:" num #獲取用戶輸入
 host $num #調用主機列表函數和傳入的參數,進行遠程登錄
 done
}
main #調用主函數
#3.3.編寫腳本進行判斷,判斷是否是root用戶登錄,如果不是root用戶就執行腳本,彈出跳板機界面
[root@shell ~]# cd /etc/profile.d/
[root@shell profile.d]# cat jump.sh
#!/bin/bash

[ $UID -ne 0 ]  . /scripts/tiaobanji.sh
#3.4.測試
#登錄demo普通用戶輸入密碼的時候就會直接跳到選項卡頁面了
#選項卡頁面
==============Host List==============
1) 192.168.86.129
2) 192.168.86.130
3) 192.168.86.131
4) 192.168.86.132
5) exit
=====================================
please select a num:1 #進行選擇
Last login: Tue Mar 31 23:48:33 2020 from 192.168.86.128
[demo@mysql ~]$
#3.5.提示:跳板機的安全
1.禁止跳板機可以從外網IP進行登錄,只能從內網IP登錄
2.其他服務器也限制只能內網IP登錄,同時禁止root登錄,做完ssh key認證,將密碼登錄禁止,通過免密碼登錄到其他服務器
#總結:if條件語句主要用于取值判斷、比較,應用比較廣,case條件語句主要是寫服務的啟動腳本,各有各的優勢。好了,shell腳本的條件語句就講解到這里了,接下來會繼續寫shell腳本的循環(包括for,while等),如果寫的不好的地方還望指出,多多交流提高,下次再會。。。
到此這篇關于詳解shell腳本中的case條件語句介紹和使用案例的文章就介紹到這了,更多相關shell case條件語句內容請搜索腳本之家以前的文章或繼續瀏覽下面的相關文章希望大家以后多多支持腳本之家!
您可能感興趣的文章:- 解決java.lang.ClassCastException的java類型轉換異常的問題
- 淺談java switch如果case后面沒有break,會出現什么情況?
- Java CAS基本實現原理代碼實例解析
- Element Cascader 級聯選擇器的使用示例
- Python基于字典實現switch case函數調用
- 淺談keras中的后端backend及其相關函數(K.prod,K.cast)
- springboot集成CAS實現單點登錄的示例代碼
- Python Switch Case三種實現方法代碼實例
- Android Broadcast 和 BroadcastReceiver的權限限制方式
- Compare And Swap底層原理及代碼示例詳解
