這篇博客將介紹如何使用Python,OpenCV對圖像進行平移轉換。平移是圖像沿x軸和y軸的移動。使用平移,可以將圖像上下左右移動,以及上述任意組合。要使用OpenCV平移圖像,只需3步:
M = np.float32([
[1, 0, shiftX],
[0, 1, shiftY]
])
轉換矩陣M被定義為浮點數組。 矩陣的第一行是[1,0,t{x}],其中t{x}是將圖像向左或向右移動的像素數。t{x}的負值將使圖像向左移動,正值將使圖像向右移動。 矩陣的第二行定義為[0,1,t{y}],其中t{y}是將圖像上下移動的像素數。t{y}的負值將使圖像上移,正值將使圖像下移。
# 對圖像進行平移
# USAGE
# python opencv_translate.py
import argparse
import cv2
import imutils
# 導入必要的包
import numpy as np
# 構建命令行參數及解析
# --image 輸入圖像路徑
ap = argparse.ArgumentParser()
ap.add_argument("-i", "--image", type=str, default="ml.jpg",
help="path to the input image")
args = vars(ap.parse_args())
# 從磁盤加載圖像并顯示
image = cv2.imread(args["image"])
image = imutils.resize(image, width=300)
cv2.imshow("Original", image)
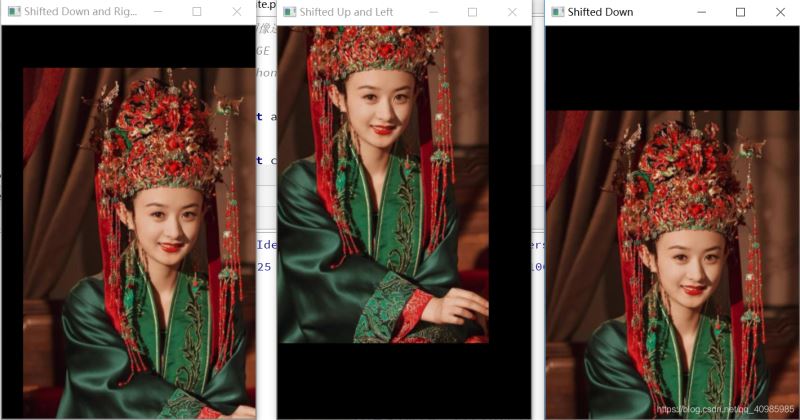
# 將圖像向右移動25像素,像下移動50像素
M = np.float32([[1, 0, 25], [0, 1, 50]])
shifted = cv2.warpAffine(image, M, (image.shape[1], image.shape[0]))
cv2.imshow("Shifted Down and Right", shifted)
# 修改圖像向左移動50像素,向上移動90像素
M = np.float32([[1, 0, -50], [0, 1, -90]])
shifted = cv2.warpAffine(image, M, (image.shape[1], image.shape[0]))
cv2.imshow("Shifted Up and Left", shifted)
# 用一行代碼實現平移——imutils.translate
shifted = imutils.translate(image, 0, 100)
cv2.imshow("Shifted Down", shifted)
cv2.waitKey(0)
cv2.destroyAllWindows()
到此這篇關于超詳細注釋之OpenCV操作圖像平移轉換的文章就介紹到這了,更多相關OpenCV圖像平移轉換內容請搜索腳本之家以前的文章或繼續瀏覽下面的相關文章希望大家以后多多支持腳本之家!