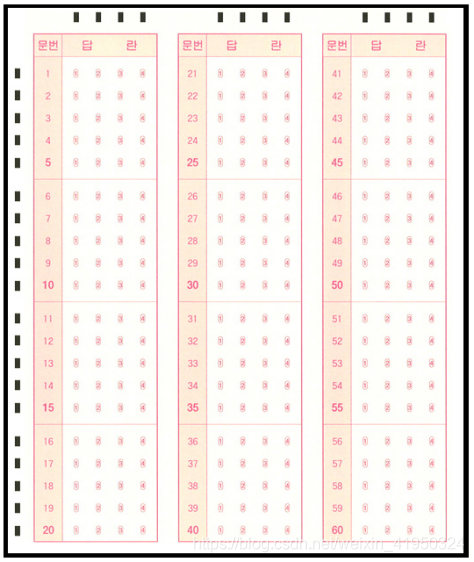
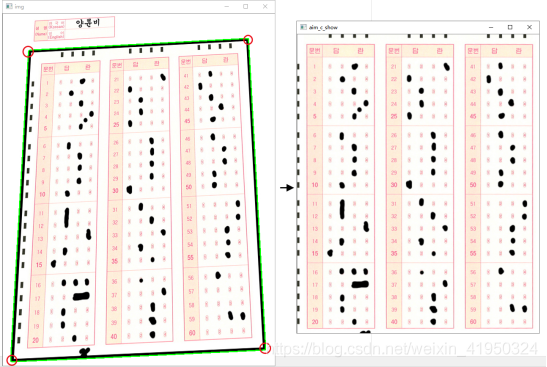
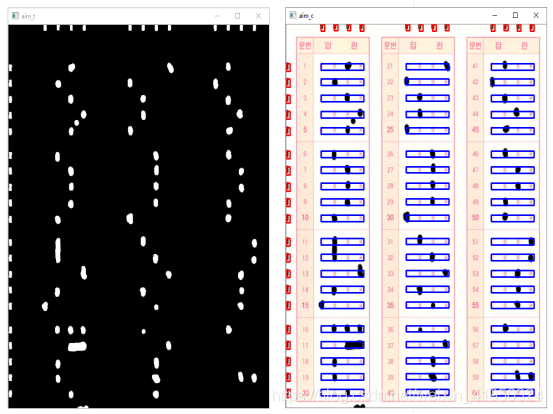
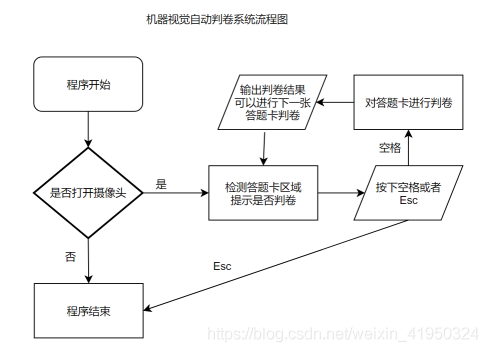
該圖像為答題卡的答題區域,黑色邊框是為了能夠在各種環境中輕易的檢測,左部分和上部分的黑色矩形,是為能夠定位到答題選項的坐標而設置,同時題目數量為20×3共60道選擇題,在進行批改試卷之前,需要手動輸入該次考試的正確答案作為模板來對識別的內容進行比較判分。
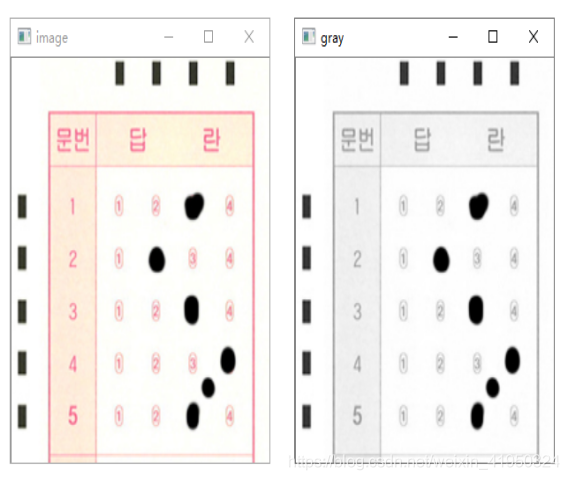
經過上一步操作后,答題卡的前背景分明,已經能夠輕易將標識矩陣和答題區域涂改信息和背景分離開來,接下來需要將圖像的標識矩陣和答題區域的涂改信息提取出來,需要進一步規劃數字圖像信息,二值化圖像能使圖像的數據量大大減少,既保留原有的數字信息,又能將無用的數據舍去,將原本數值范圍為0-255的圖像信息分割成像素值為0或255的二值圖像,在這里0值代表背景,無用且不需要處理的信息,255表示目標信息(標識矩陣和答題區域的涂改信息),其算法原理非常簡單,圖像中像素值大于閾值時為255,小于閾值時為0。在二值化時,需要確定一個閾值,而這個閾值人為來定義是無法隨著環境變換隨時處于最優狀態,在這里我們使用1979年由學者大津提出的對圖像分割的高效算法來處理。大津法算法原理:
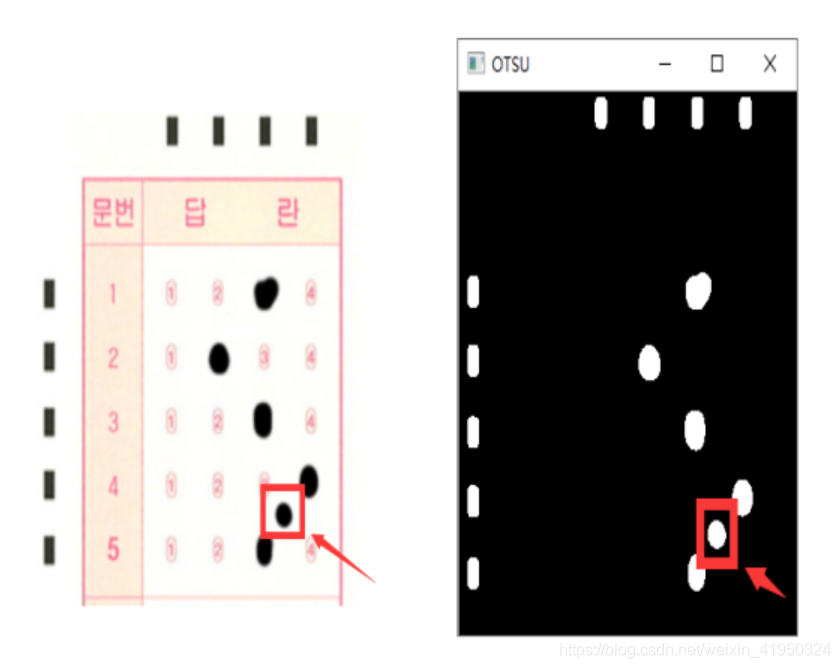
此時已經得到較為完美的預處理圖,但是不難發現,我們答題卡有一小塊干擾像素。在實際情況中,這種干擾信息是有可能出現的,且大小與清晰度并沒有固定范圍,因此,在判卷之前,需要盡可能的將這種干擾信息去除,前面的各種圖像預處理方法僅僅是將圖像的前景和背景分離提取出定位標識信息和涂改信息,面對這樣的情況,選擇使用機器視覺中
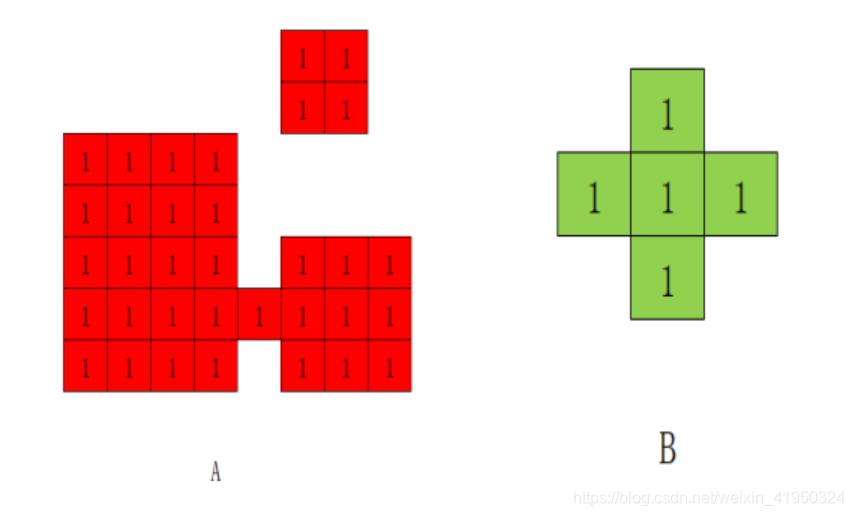
開運算:先對圖像進行腐蝕操作,再進行膨脹操作,就是開運算操作,能夠消除細小的物體,將兩個物體的細小的連接處去除從而分離兩個物體,且擁有平滑邊界的效果,被廣泛應用于去除圖像噪聲。
實驗發現,右上角的小塊圖像噪聲被腐蝕掉了,同時,下方的像素塊被腐蝕了一圈且兩塊被分割開來,為了盡量減少圖像的信息被過度腐蝕掉,接下來一步需要使用膨脹算法,將圖像像素膨脹回來,盡可能去掉圖像噪聲的同時,也減少圖像信息的過度減少。
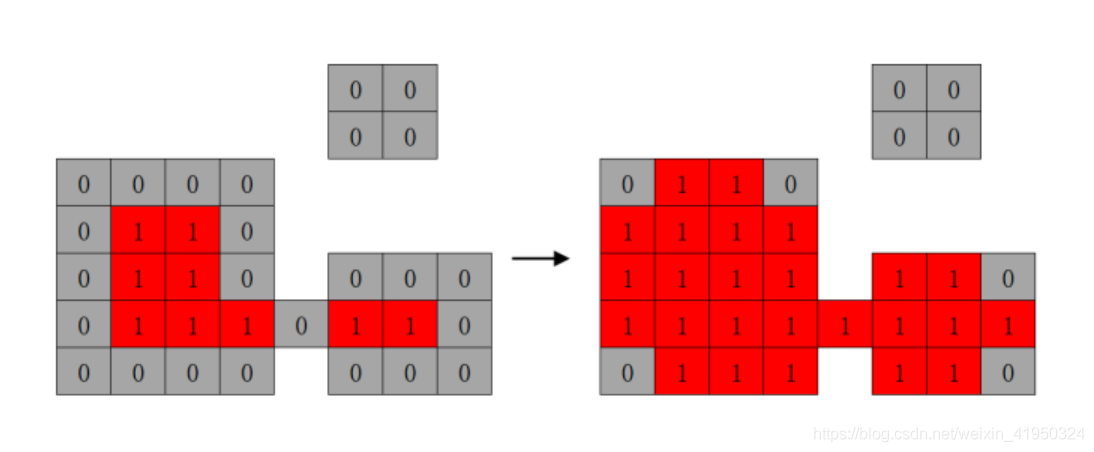
步驟2:將卷積核B與原圖像進行卷積操作,計算原圖像包裹卷積核B的區域的像素最大值,這個區域則作為膨脹操作后的結果。使用腐蝕操作后的結果來進行膨脹操作,實驗效果如下:
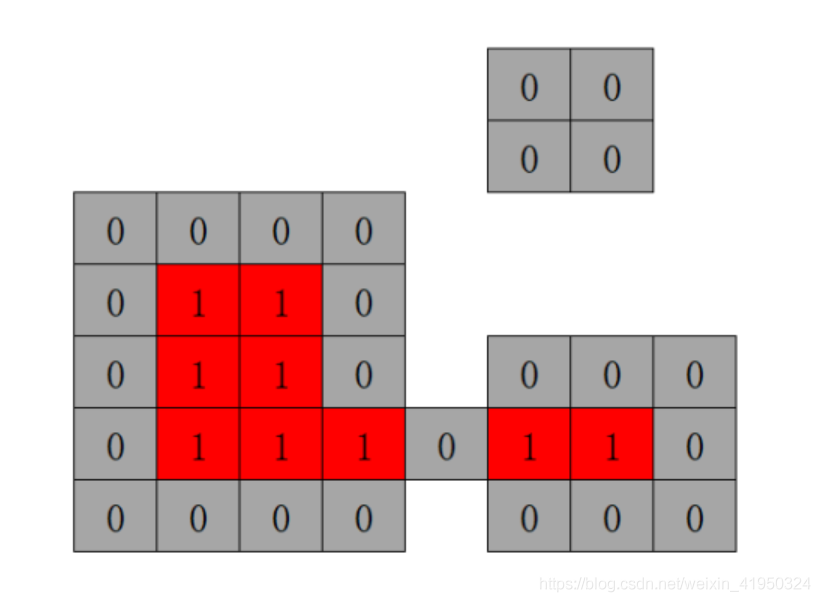
步驟進行到這,發現右下角那塊較大的圖像噪聲,仍舊無法消除,主要原因是該噪聲較大,形狀大小與顏色深度與目標信息相似,在準確保留目標信息的情況下難以將其分割開來,因此接下來選擇通過定位圖像信息來排除該圖像噪聲,對其不進行操作。
通過這一系列的操作后便可得到圖像內容里的邊緣信息,我們前面已經對圖像進行了深度的去噪操作,已經將大部分噪音完全清除,接下來的操作應該是區分定位區域和判卷區域的坐標,來對其進行判斷處理,這一步只是為了觀察圖像的邊緣信息,屬于測試步驟,在實際的運用中,并不會使用該步驟來處理圖像。
通過輪廓檢測可以計算多邊形的外界,在這里我們需要檢測出答題卡涂改區域的黑色邊框位置,定位得到邊框的四個頂點坐標,再對目標進行透視矯正操作。到這一步驟,已經得到矯正后的答題區域,接下來需要對圖像的答題區域進行定位判斷。
import cv2
import numpy as np
# 選取區域去除邊緣
dist = 5
# 畫圖線粗度
line_w = 2
# 畫筆顏色
red = (0, 0, 255)
green = (0, 255, 0)
blue = (255, 0, 0)
# 高斯模糊算法
#防止顏色值超出顏色取值范圍(0-255)
# 開運算,先腐蝕,后膨脹
# 圖像腐蝕
def etch(img, size):
h=img.shape[0]
w=img.shape[1]
img1=np.zeros((h,w),np.uint8)
for i in range (1,h-1):
for j in range (1,w-1):
min=img[i,j]
for k in range (i-size,i+size):
for l in range (j-size,j+size):
if k0|k>=h-1|l0|l>=w-1:
continue
if img[k,l]min:
min=img[k,l]
img1[i,j]=min
return img1
# 圖像膨脹
def expand(img, size):
h=img.shape[0]
w=img.shape[1]
img1=np.zeros((h,w),np.uint8)
for i in range (1,h-1):
for j in range (1,w-1):
max=img[i,j]
for k in range (i-size,i+size):
for l in range (j-size,j+size):
if k0|k>=h-1|l0|l>=w-1:
continue
if img[k,l]>max:
max=img[k,l]
img1[i,j]=max
return img1
# 開運算
def opening(image, size):
etch_img = etch(image, size)
expand_img = expand(etch_img, size)
return expand_img
# 最大值法求圖像灰度值
def graying(image):
    h, w = image.shape[0], image.shape[1]
    gray = np.zeros((h, w), np.uint8)
    for i in range(h):
        for j in range(w):
            gray[i, j] = max(image[i,j][0], image[i,j][1], image[i,j][2])
    return gray
# OTSU
# 二值化
def otsu(img):
h=img.shape[0]
w=img.shape[1]
m=h*w
otsuimg=np.zeros((h,w),np.uint8)
threshold_max=threshold=0
histogram=np.zeros(256,np.int32)
probability=np.zeros(256,np.float32)
for i in range(h):
for j in range(w):
s=img[i,j]
histogram[s]+=1
for k in range(256):
probability[k]=histogram[k]/m
for i in range(255):
w0 = w1 = 0
fgs = bgs = 0
for j in range (256):
if j=i:
w0+=probability[j]
fgs+=j*probability[j]
else:
w1+=probability[j]
bgs+=j*probability[j]
u0=fgs/w0
u1=bgs/w1
g=w0*w1*(u0-u1)**2
if g>=threshold_max:
threshold_max=g
threshold=i
for i in range (h):
for j in range (w):
if img[i,j]threshold:
otsuimg[i,j]=255
else:
otsuimg[i,j]=0
return otsuimg
# 透視變換
from imutils.perspective import four_point_transform
def wPs(image, points):
    warped = four_point_transform(image, points)
    return warped
# 輪廓檢測函數
def find_contour(image):
contours = cv2.findContours(image, cv2.RETR_EXTERNAL, cv2.CHAIN_APPROX_SIMPLE)[0]
return contours
# 冒泡排序
def bubble_sort(lists, type):
'''
:param lists: 排序列表
:param type: 排序類型
:return: 排序結果
'''
count = len(lists)
for i in range(0, count):
xi, yi = cv2.boundingRect(lists[i])[0], cv2.boundingRect(lists[i])[1]
for j in range(i + 1, count):
xj, yj = cv2.boundingRect(lists[j])[0], cv2.boundingRect(lists[j])[1]
if type == "title":
if yi > yj:
lists[i], lists[j] = lists[j], lists[i]
elif type == "answer":
if xi > xj:
lists[i], lists[j] = lists[j], lists[i]
else:
return print("排序出錯")
return lists
#統計結果
def count(roi):
'''
:param roi: 答題選項區域
:return: 選擇結果
'''
grade = 0
long = roi.shape[1] / 8
contour = find_contour(roi)
if len(contour) == 0:
return 0
elif len(contour) >= 2:
return -2
for c in contour:
perimeter = cv2.arcLength(c, True)
if perimeter > 5:
x = cv2.boundingRect(c)[0]
if x long:
grade = 1
elif x long*3:
grade = 2
elif x long*5:
grade = 3
else:
grade = 4
return grade
# 輪廓檢測處理
def contours(img, dst):
'''
:param img: 查看效果圖像
:param dst: 輪廓檢測對象
:return: 效果圖像,輪廓檢測效果圖像,檢測結果
'''
img_dst = img.copy()
edged = cv2.Canny(dst, 10, 100)
img_cnts = find_contour(edged)
# 如果未檢測到輪廓則退出
c_len = len(img_cnts)
if c_len == 0:
print("error:No find contours!")
return img, dst
# 畫出所有輪廓
## 得到答題區域
pt = None
for c in img_cnts:
cv2.drawContours(img, [c], -1, red, line_w)
perimeter = cv2.arcLength(c, True)
if perimeter 40:
continue
approx = cv2.approxPolyDP(c, 0.02*perimeter, True)
if len(approx) == 4:
pt = approx
hull = cv2.convexHull(c)
cv2.polylines(img, [hull], True, green, line_w)
pt = pt.reshape(4,2)
# 透視變換
img_dst = wPs(img_dst, pt)
dst = wPs(dst, pt)
img_dst = img_dst[dist:img_dst.shape[0]-dist,dist:img_dst.shape[1]-dist]
dst = dst[dist:dst.shape[0]-dist,dist:dst.shape[1]-dist]
# 處理答題卡答題區域部分
contours_roi = find_contour(dst)
title, answer = [], []
for c in contours_roi:
x, y, w, h = cv2.boundingRect(c)
if x >= dist and y = dist:
answer.append(c)
if x dist and y > dist:
title.append(c)
# 冒泡排序
title = bubble_sort(title, "title")
answer = bubble_sort(answer, "answer")
# 判卷
result = np.zeros(60, dtype=np.int8)
for title_number in range(60):
miny = cv2.boundingRect(title[title_number%20])[1]
x, y, w, h = cv2.boundingRect(answer[int(title_number/20+1)*4-1])
x1= cv2.boundingRect(answer[int(title_number/20+1)*4-4])[0]
maxx, maxy = x+w, miny+h
cv2.rectangle(img_dst, (x1, miny), (maxx, maxy), blue, line_w)
roi = dst[miny:maxy, x1:maxx]
grade = count(roi)
result[title_number] = grade
print("title"+str(title_number+1)+":",grade)
return img, img_dst, result
def new_contours(img_dst, aim_otsu):
'''
:param img_dst: 查看效果圖像
:param aim_otsu: 答題卡區域
:return: 效果圖像, 識別結果
'''
# 處理答題卡答題區域部分
contours_roi = find_contour(aim_otsu)
title, answer = [], []
for c in contours_roi:
x, y, w, h = cv2.boundingRect(c)
if x >= dist and y = dist:
answer.append(c)
if x dist and y > dist:
title.append(c)
# 冒泡排序
title = bubble_sort(title, "title")
answer = bubble_sort(answer, "answer")
# 判卷
result = np.zeros(60, dtype=np.int8)
for title_number in range(60):
miny = cv2.boundingRect(title[title_number % 20])[1]
x, y, w, h = cv2.boundingRect(answer[int(title_number / 20 + 1) * 4 - 1])
x1 = cv2.boundingRect(answer[int(title_number / 20 + 1) * 4 - 4])[0]
maxx, maxy = x + w, miny + h
cv2.rectangle(img_dst, (x1, miny), (maxx, maxy), blue, 1)
roi = aim_otsu[miny:maxy, x1:maxx]
grade = count(roi)
result[title_number] = grade
return img_dst, result
# 主要步驟
def run(img):
'''
:param img: 可操作的原圖像
:return: 預處理后的圖像
'''
print("image.shape:", img.shape)
# 最小值法求圖像灰度值
gray = graying(img)
# 二值分割大津法
thresh = otsu(gray)
img_open = opening(thresh, 1)
return img_open
from PIL import Image, ImageDraw, ImageFont
font_china = ImageFont.truetype('simhei.ttf', 40, encoding="utf-8")
def ChinaToImage(image, str, color):
'''
:param image: 原圖像
:param str: 需要寫的字
:param color:畫筆顏色
:return:寫完字的圖像
'''
img_PIL = Image.fromarray(cv2.cvtColor(image, cv2.COLOR_BGR2RGB))
draw = ImageDraw.Draw(img_PIL)
draw.text((20, 20), str, color,font=font_china)
return cv2.cvtColor(np.asarray(img_PIL),cv2.COLOR_RGB2BGR)
# 提示是否可以開始函數
def hint(image, b):
'''
:param image: 攝像頭畫面
:param b: 提示是否可以批卷
:return: 返回寫入提示的畫面
'''
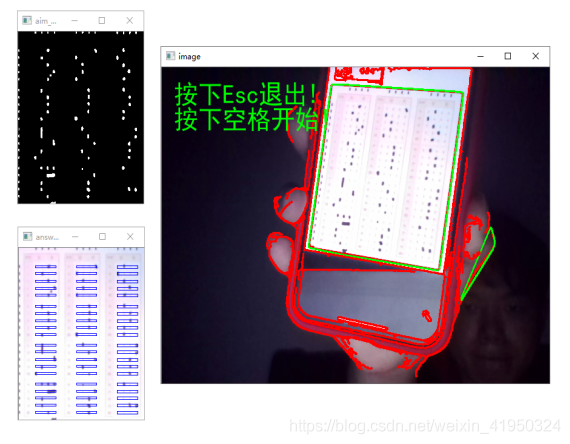
str_s = '按下Esc退出!\n按下空格開始!'
str_e = '按下Esc退出!\n請調整好角度!'
if b:
image = ChinaToImage(image, str_s, green)
else:
image = ChinaToImage(image, str_e, red)
return image
# 查找答題卡輪廓,提示是否可以開始
def star_bool(image):
'''
:param image: 攝像頭畫面
:return: 是否可以開始批卷
'''
image_gray = graying(image)
edged = cv2.Canny(image_gray, 10, 100)
con = find_contour(edged)
b = False
points = None
for c in con:
cv2.drawContours(image, [c], -1, red, line_w)
perimeter = cv2.arcLength(c, True)
w, h = cv2.minAreaRect(c)[1]
if w == 0 or h == 0 or w/h 0.6:
continue
if perimeter 200:
continue
approx = cv2.approxPolyDP(c, 0.02 * perimeter, True)
if len(approx) != 4:
continue
b = True
points = approx
hull = cv2.convexHull(c)
cv2.polylines(image, [hull], True, green, line_w)
aim_c = None
aim_otsu = None
if b:
try:
points = points.reshape(4, 2)
aim = wPs(image_gray, points)
aim_c = wPs(image, points)
aim = aim[dist:aim.shape[0] - dist, dist:aim.shape[1] - dist]
aim_c = aim_c[dist:aim_c.shape[0] - dist, dist:aim_c.shape[1] - dist]
aim_otsu = otsu(aim)
cv2.imshow('aim_otsu', aim_otsu)
except:
print('角度誤差大!')
return b, aim_c, aim_otsu
# 批改函數
def correct(model_answer, result):
'''
:param model_answer: 該試卷正確答案
:param result: 識別答案
:return: 顯示批卷結果,顯示效果,可檢測對象
'''
if len(model_answer) != 60:
print('答案模板數量不對!\n請重新設置答案。')
return 0
# 成績
grade = {'score':0, 'no choice':0, 'mul':0}
no_choice_number = []
mul_number = []
# 題的分值,topik考試基本每題兩分
cube = 2
# 計算分數
for index in range(len(model_answer)):
if model_answer[index] > 4 or model_answer[index] 1:
print("答案模板有誤!\n請重新設置答案。")
return 0
if result[index] == 0:
no_choice_number.append(index+1)
grade['no choice'] += 1
continue
if result[index] == -2:
mul_number.append(index+1)
grade['mul'] += 1
continue
if model_answer[index] == result[index]:
grade['score'] += cube
# 批卷完成
print('-' * 70)
print('-' * 70)
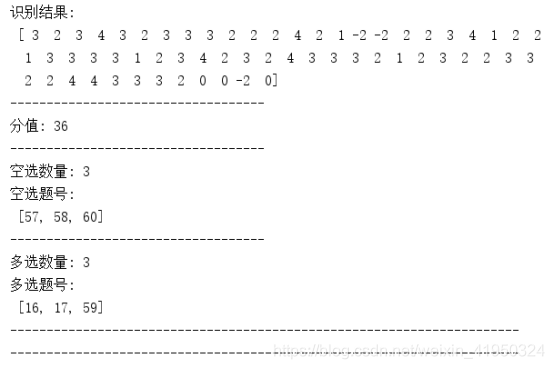
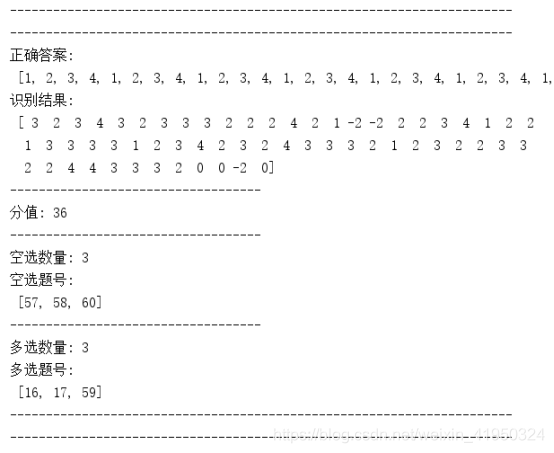
print('正確答案:\n', model_answer)
print('識別結果:\n', result)
print('-'*35)
print('分值:', grade['score'])
print('-' * 35)
print('空選數量:', grade['no choice'])
print('空選題號:\n', no_choice_number)
print('-' * 35)
print('多選數量:', grade['mul'])
print('多選題號:\n', mul_number)
print('-' * 70)
print('-' * 70)
def main():
# 該變量為本次試卷正確答案模板,需要根據試卷受到修改原本正確答案
model_answer = [1, 2, 3, 4,
1, 2, 3, 4,
1, 2, 3, 4,
1, 2, 3, 4,
1, 2, 3, 4,
1, 2, 3, 4,
1, 2, 3, 4,
1, 2, 3, 4,
1, 2, 3, 4,
1, 2, 3, 4,
1, 2, 3, 4,
1, 2, 3, 4,
1, 2, 3, 4,
1, 2, 3, 4,
1, 2, 3, 4,]
cap = cv2.VideoCapture(0)
cv2.namedWindow("image", 0)
cv2.resizeWindow("image", 640, 480)
while True:
sucess, img = cap.read()
img_temp = img.copy()
b, aim, aim_otsu = star_bool(img_temp)
img_temp = hint(img_temp, b)
cv2.imshow("image", img_temp)
k = cv2.waitKey(16)
# Esc結束
if k == 27:
break
# 空格按下開始
elif k == 32:
try:
img_dst, result = new_contours(aim, aim_otsu)
correct(model_answer, result)
cv2.imshow('answer_roi', img_dst)
except:
print("您拍答題卡的角度誤差過大")
else:
if cv2.waitKey(0) == 27:
break
else:
continue
cap.release()
cv2.destroyAllWindows()
if __name__=="__main__":
main()
到此這篇關于python利用opencv如何實現答題卡自動判卷的文章就介紹到這了,更多相關python opencv答題卡自動判卷內容請搜索腳本之家以前的文章或繼續瀏覽下面的相關文章希望大家以后多多支持腳本之家!