本文介紹了Canvas 文本轉粒子效果的實現代碼,分享給大家,希望對大家有所幫助,具體如下:

通過粒子來繪制文本讓人感覺很有意思,配合粒子的運動更會讓這個效果更加酷炫。本文介紹在 canvas 中通過粒子來繪制文本的方法。
實現原理
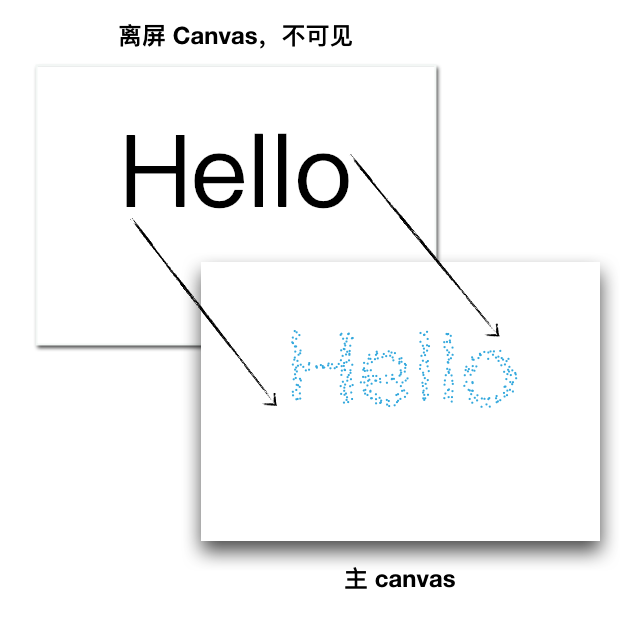
總的來說要做出將文本變成粒子展示的效果其實很簡單,實現的原理就是使用兩張 canvas,一張是用戶看不到的 A canvas,用來繪制文本;另一張是用戶看到的 B canvas,用來根據 A 的文本數據來生成粒子。直觀表示如圖:
創建離屏 canvas
HTML 只需要放置主 canvas 即可:
<!-- HTML 結構 -->
<html>
<head>
  ...
</head>
<body>
  <canvas id="stage"></canvas>
</body>
</html>
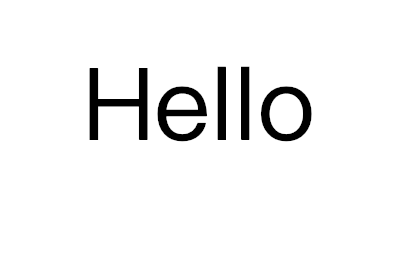
然后創建一個離屏 canvas,并繪制文本:
const WIDTH = window.innerWidth;
const HEIGHT = window.innerHeight;

const offscreenCanvas = document.createElement('canvas');
const offscreenCtx = offscreenCanvas.getContext('2d');

offscreenCanvas.width = WIDTH;
offscreenCanvas.height = HEIGHT;

offscreenCtx.font = '100px PingFang SC';
offscreenCtx.textAlign = 'center';
offscreenCtx.baseline = 'middle';
offscreenCtx.fillText('Hello', WIDTH / 2, HEIGHT / 2);
這時頁面上什么也沒有發生,但實際上可以想象在離屏 canvas 上,此時應該如圖所示:
核心方法 getImageData
使用 canvas 的 getImageData 方法,可以獲取一個 ImageData 對象,這個對象用來描述 canvas 指定區域內的像素數據。也就是說,我們可以獲取 “Hello” 這個文本每個像素點的位置和顏色,也就可以在指定位置生成粒子,最后形成的效果就是粒子拼湊成文本了。
要獲取像素信息,需要使用 ImageData 對象的 data 屬性,它將所有像素點的 rgba 值鋪開成了一個數組,每個像素點有 rgba 四個值,這個數組的個數也就是 像素點數量 * 4。
假設我選取了一個 3 * 4 區域,那么一共 12 個像素點,每個像素點有 rgba 四個值,所以 data 這個數組就會有 12 * 4 = 48 個元素。
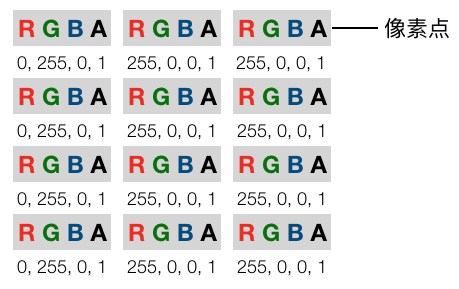
如果打印出 data,可以看到即從左往右,從上往下排列這些像素點的 rgba。

當然我們要獲取的區域必須要包含文本,所以應該獲取整個離屏 canvas 的區域:
const imgData = offscreenCtx.getImageData(0, 0, WIDTH, HEIGHT).data;
生成粒子
拿到 ImageData 后,通過遍歷 data 數組,可以判斷在離屏 canvas 的畫布中,哪些點是有色彩的(處于文本中間),哪些點是沒有色彩的(不在文本上),把那些有色彩的像素位置記下來,然后在主 canvas 上生成粒子,就 ok 了。
首先創建一下粒子類:
class Particle {
    constructor (options = {}) {
        const { x = 0, y = 0, color = '#fff', radius = 5} = options;
        this.radius = radius;
        this.x = x;
        this.y = y;
        this.color = color;
    }

    draw (ctx) {
        ctx.beginPath();
        ctx.arc(this.x, this.y, this.radius, 0, 2 * Math.PI, false);
        ctx.fillStyle = this.color;
        ctx.fill();
        ctx.closePath();
    }
}
遍歷 data,我們可以根據透明度,也就是 rgba 中的第四個元素是否不為 0 來判斷該像素是否在文本中。
const particles = [];
const skip = 4;
for (var y = 0; y < HEIGHT; y += skip) {
    for (var x = 0; x < WIDTH; x += skip) {
        var opacityIndex = (x + y * WIDTH) * 4 + 3;
        if (imgData[opacityIndex] > 0) {
            particles.push(new Particle({
                x,
                y,
                radius: 1,
                color: '#2EA9DF'
            }));
        }
    }
}
我們用 particles 數組來存放所有的粒子,這里的 skip 的作用是遍歷的步長,如果我們一個像素一個像素地掃,那么最后拼湊文本的粒子將會非常密集,增大這個值,最后產生的粒子就會更稀疏。
最后在創建主 canvas 并繪制即可:
const canvas = document.querySelector('#stage');
canvas.width = WIDTH;
canvas.height = HEIGHT;
const ctx = canvas.getContext('2d');

for (const particle of particles) {
    particle.draw(ctx);
}
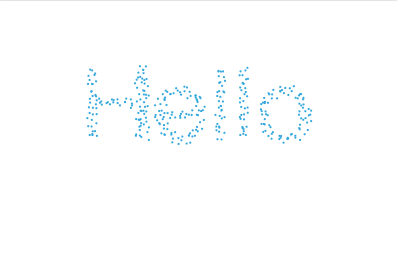
效果如下:
完整代碼見01-basic-text-to-particles
添加效果
了解實現原理之后,其實其他的就都是給粒子添加一些動效了。首先可以讓粒子有一些隨機的位移,避免看上去過于整齊。
const particles = [];
const skip = 4;
for (var y = 0; y < HEIGHT; y += skip) {
    for (var x = 0; x < WIDTH; x += skip) {
        var opacityIndex = (x + y * WIDTH) * 4 + 3;
        if (imgData[opacityIndex] > 0) {
            // 創建粒子時加入隨機位移
            particles.push(new Particle({
                x: x + Math.random() * 6 - 3,
                y: y + Math.random() * 6 - 3,
                radius: 1,
                color: '#2EA9DF'
            }));
        }
    }
}
效果如下:
如果想實現變大的效果,如:

這種要怎么實現呢,首先需要隨機產生粒子的大小,這只需要在創建粒子時對 radius 進行 random 即可。另外如果要讓粒子半徑動態改變,那么需要區分開粒子的渲染半徑和初始半徑,并使用 requestAnimationFrame 進行動畫渲染:
class Particle {
    constructor (options = {}) {
        const { x = 0, y = 0, color = '#fff', radius = 5} = options;
        this.radius = radius;
        // ...
        this.dynamicRadius = radius; // 添加 dynamicRadius 屬性
    }

    draw (ctx) {
        // ...
        ctx.arc(this.x, this.y, this.dynamicRadius, 0, 2 * Math.PI, false); // 替換為 dynamicRadius
        // ...
    }

    update () {
        // TODO
    }
}

requestAnimationFrame(function loop() {
    requestAnimationFrame(loop);

    ctx.fillStyle = '#fff';
    ctx.fillRect(0, 0, WIDTH, HEIGHT);

    for (const particle of particles) {
        particle.update();
        particle.draw(ctx);
    }
});
那么關鍵就在于粒子的 update 方法要如何實現了,假設我們想讓粒子半徑在 1 到 5 中平滑循環改變,很容易讓人聯想到三角函數,如:

橫軸應該是與時間相關,可以再維護一個變量每次調用 update 的時候進行加操作,簡單做也可以直接用時間戳來進行計算。update 方法示例如下:
update () {
    this.dynamicRadius = 3 + 2 * Math.sin(new Date() / 1000 % 1000 * this.radius);
}
完整代碼見 02-text-to-particles-with-size-changing
以上就是本文的全部內容,希望對大家的學習有所幫助,也希望大家多多支持腳本之家。
