根據網絡教程實現。zabbix3.4,使用腳本和sendEmail。
1.下載并解壓縮sendEmail到/usr/local/bin下面��,修改權限�����。
下載網址:
SendEmail - Send email with this free command line email client http://caspian.dotconf.net/menu/Software/SendEmail/
修改權限:
chown zabbix:zabbix /usr/local/bin/sendEmail
2.進行發郵件測試���。
/usr/local/bin/sendEmail -f xxxx@163.com(發件郵箱) -s smtp.163.com -u "郵件標題" -m "郵件內容" -o message-content-type=html -o message-charset=utf8 -xu xxxx@163.com(發件郵箱賬號) -xp “網易郵箱授權碼” -t “目標郵箱”
3.發郵件測試通過后�����,進入/usr/local/zabbix/share/zabbix/alertscripts/目錄����,并新建mail.sh文件��,授予權限�����;
4.mail.sh內容:
#!/bin/bash
to=$1
subject=$2
body=$3
/usr/local/bin/sendEmail -o tls=auto -f xxxx@163.com -t "$to" -s smtp.163.com -u "$subject" -o message-content-type=html -o message-charset=utf8 -xu xxxx@163.com -xp "郵箱客戶端授權碼" -m "$body"
5.測試報錯
[root@centos7 alertscripts]# ./mail.sh “目標郵箱” test_topic hello_world!
*******************************************************************
 Using the default of SSL_verify_mode of SSL_VERIFY_NONE for client
 is deprecated! Please set SSL_verify_mode to SSL_VERIFY_PEER
 possibly with SSL_ca_file|SSL_ca_path for verification.
 If you really don't want to verify the certificate and keep the
 connection open to Man-In-The-Middle attacks please set
 SSL_verify_mode explicitly to SSL_VERIFY_NONE in your application.
*******************************************************************
 at /usr/local/bin/sendEmail line 1906.
invalid SSL_version specified at /usr/share/perl5/vendor_perl/IO/Socket/SSL.pm line 444.
在sendemail中1906行的內容��,從
if (! IO::Socket::SSL->start_SSL($SERVER, SSL_version => ‘SSLv3 TLSv1‘)) {
修改為
if (! IO::Socket::SSL->start_SSL($SERVER)) {
再次測試�,成功。
[root@centos7 alertscripts]# ./mail.sh “目標郵箱” test_topic hello_world!
*******************************************************************
 Using the default of SSL_verify_mode of SSL_VERIFY_NONE for client
 is deprecated! Please set SSL_verify_mode to SSL_VERIFY_PEER
 possibly with SSL_ca_file|SSL_ca_path for verification.
 If you really don't want to verify the certificate and keep the
 connection open to Man-In-The-Middle attacks please set
 SSL_verify_mode explicitly to SSL_VERIFY_NONE in your application.
*******************************************************************
 at /usr/local/bin/sendEmail line 1906.
Aug 08 15:42:42 wanbu sendEmail[25763]: Email was sent successfully!
6.zabbix-web配置
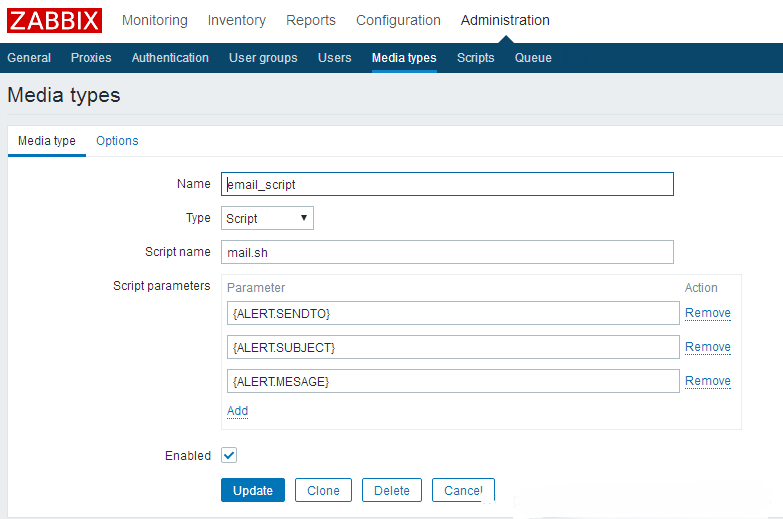
在zabbix3.4中���,有3處需要配置���,actions���,media type,users����。actions負責判斷��,發送郵件�����;media type負責選擇腳本��,傳遞參數�;users負責明確告警信息發送給誰等信息�。
按照官網的介紹配置即可����,這部分實在懶得寫了。唯一需要注意的是,media type需要添加3個參數�,分別是{ALERT.SENDTO},{ALERT.SUBJECT},{ALERT.MESAGE}���,分別對于mail.sh中的to�、subject和body。
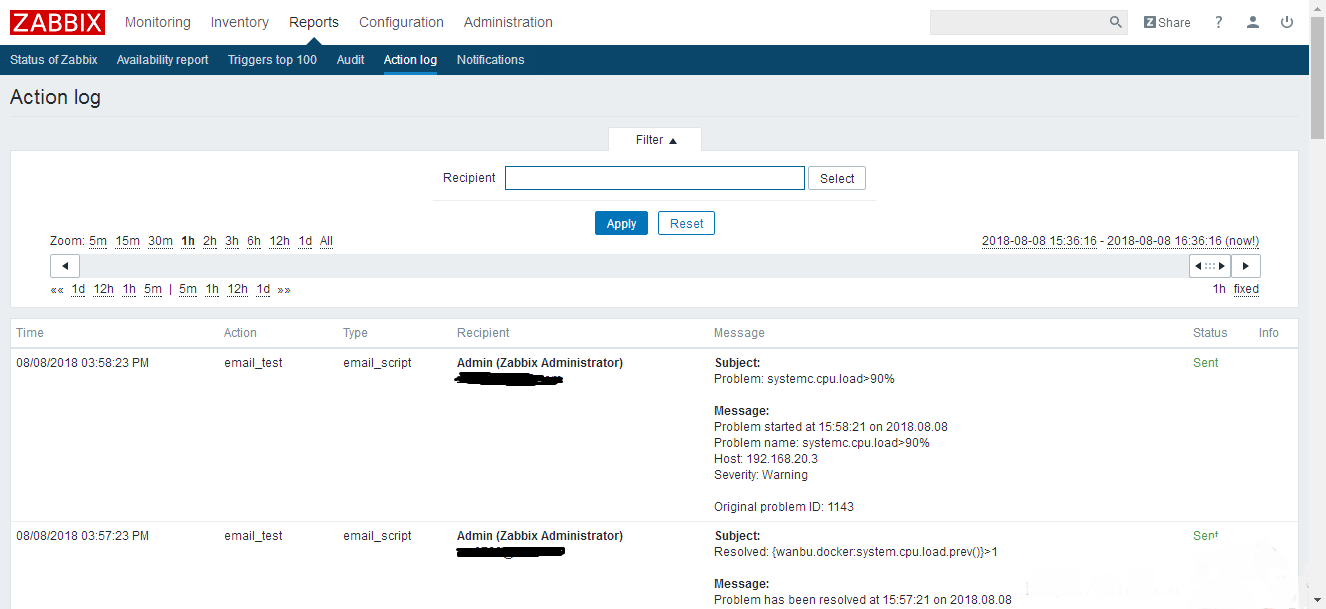
7.最后,點擊“Reports”-“action log”��,可以查看郵件是否發送成功,不成功的原因。
總結
以上就是這篇文章的全部內容了�����,希望本文的內容對大家的學習或者工作具有一定的參考學習價值�,謝謝大家對腳本之家的支持�。如果你想了解更多相關內容請查看下面相關鏈接
