使用go-kit中間件時,一般在endpoint中進行中間件的開發。
在endpoint層插入hystrix中間件的插入。
endpoint.go
func MakeEndpoint (svc services.StringService) endpoint.Endpoint {
 return func(ctx context.Context, request interface{}) (response interface{}, err error) {
  req := request.(*StringService.Request)
  rep , err  := svc.Diff(ctx , req)
  return rep , err
 }
}
go-kit使我們更注重對服務邏輯的開發,對中間過程的省略會減少很多的錯誤發生。
main.go
package main

import (
 "balencegrpc/services"
 "balencegrpc/router"
 "balencegrpc/proto"
 "balencegrpc/discover"
 "balencegrpc/endpoints"
 "github.com/go-kit/kit/circuitbreaker"
 "google.golang.org/grpc"
 "google.golang.org/grpc/health/grpc_health_v1"
 "log"
 "net"
)

func main() {
 //svc := new()
  svc := services.ServiceI{}
 endpoint := circuitbreaker.Hystrix("testname")(endpoints.MakeEndpoint(svc))
 lis , err := net.Listen("tcp" , ":8081")
 if err != nil {
  log.Println(err)
  return
 }
 router := router.NewRouter(svc , endpoint)
 grpcserver := grpc.NewServer()
 c := discover.Service{}
 grpc_health_v1.RegisterHealthServer(grpcserver , c)
 StringService.RegisterStringServiceServer(grpcserver , router)
 rs := discover.NewService()
 rs.Register("127.0.0.1" , 8081)
 grpcserver.Serve(lis)
}
我們在main.go中進行添加hystrix對endpoint進行封裝,,使用hystrix進行服務熔斷的處理。其實使用go-kit封裝的。也可以自行封裝一個中間件,在創建endpoint時進行封裝
補充:go-kit微服務熔斷機制的實現
在微服務架構中,每一個微服務都是一個獨立的業務功能單元,而一個應用一般由多個微服務組成,微服務之間的交互是通過RPC(遠程過程調用)完成。
比如,我們的應用是微服務A調用微服務B和微服務C來完成的,而微服務B又需要調用微服務D,微服務D又需要調用微服務E。如果在調用的鏈路上對微服務E的調用,響應時間過長或者服務不可用,那么對微服務D的調用就會占用越來越多的系統資源,進而引起微服務D的系統崩潰,微服務D的不可用,又會連鎖反應的引起微服務B崩潰,進而微服務A崩潰,最終導致整個應用不可用。這也就是所謂的“雪崩效應”。
介紹
go-kit 提供了三種熔斷
1、 gobreaker
2、 handy
3、 hystrix-go
hystrix用的比較多,我們來介紹下go-kit中hystrix的使用方法
go-kit的hystrix
Middleware的實現
1、 Hystrix返回Middleware 此中間件會在原來的endPoint包一層Hystrix的endPoint
2、 hystrix通過傳入的commanName獲取對應的Hystrix的設置,并設置run失敗時運行的fallback函數為nil
3、 我們也可以自己實現middleware包裝endPoint
func Hystrix(commandName string) endpoint.Middleware {
   return func(next endpoint.Endpoint) endpoint.Endpoint {
      return func(ctx context.Context, request interface{}) (response interface{}, err error) {
         var resp interface{}
         if err := hystrix.Do(commandName, func() (err error) {
            resp, err = next(ctx, request)
            return err
         }, nil); err != nil {
            return nil, err
         }
         return resp, nil
      }
   }
}
客戶端hystrix配置
1、Timeout 【請求超時的時間】
2、ErrorPercentThreshold【允許出現的錯誤比例】
3、SleepWindow【熔斷開啟多久嘗試發起一次請求】
4、MaxConcurrentRequests【允許的最大并發請求數】
5、RequestVolumeThreshold 【波動期內的最小請求數,默認波動期10S】
commandName := "my-endpoint"
hystrix.ConfigureCommand(commandName, hystrix.CommandConfig{
  Timeout: 1000 * 30,
  ErrorPercentThreshold: 1,
  SleepWindow: 10000,
  MaxConcurrentRequests: 1000,
  RequestVolumeThreshold: 5,
})
增加熔斷中間件的包裝
breakerMw := circuitbreaker.Hystrix(commandName)
//增加熔斷中間件
reqEndPoint = breakerMw(reqEndPoint)
實例
1、protobuf文件及生成對應的go文件
syntax = "proto3";
// 請求書詳情的參數結構  book_id 32位整形
message BookInfoParams {
    int32 book_id = 1;
}

// 書詳情信息的結構   book_name字符串類型
message BookInfo {
    int32 book_id = 1;
    string  book_name = 2;
}

// 請求書列表的參數結構  page、limit   32位整形
message BookListParams {
    int32 page = 1;
    int32 limit = 2;
}

// 書列表的結構    BookInfo結構數組
message BookList {
    repeated BookInfo book_list = 1;
}
// 定義 獲取書詳情  和 書列表服務   入參出參分別為上面所定義的結構
service BookService {
    rpc GetBookInfo (BookInfoParams) returns (BookInfo) {}
    rpc GetBookList (BookListParams) returns (BookList) {}
}
生成對應的go語言代碼文件:protoc --go_out=plugins=grpc:. book.proto (其中:protobuf文件名為:book.proto)
注:由于演示熔斷機制,也就是Server出現問題的時候進行熔斷,因此本文Server端代碼可以不用。
2、Client端代碼
package main
import (
	"MyKit"
	"context"
	"fmt"
	"github.com/afex/hystrix-go/hystrix"
	"github.com/go-kit/kit/circuitbreaker"
	"github.com/go-kit/kit/endpoint"
	"github.com/go-kit/kit/log"
	"github.com/go-kit/kit/sd"
	"github.com/go-kit/kit/sd/etcdv3"
	"github.com/go-kit/kit/sd/lb"
	"google.golang.org/grpc"
	"io"
	"time"
)

func main() {
	var (
		//注冊中心地址
		etcdServer = "127.0.0.1:2379"
		//監聽的服務前綴
		prefix = "/services/book/"
		ctx    = context.Background()
	)
	//對hystrix進行配置
	commandName:="my_endpoint"
	hystrix.ConfigureCommand(commandName,hystrix.CommandConfig{
		Timeout:1000*3, //超時
		MaxConcurrentRequests:100, //最大并發的請求數
		RequestVolumeThreshold:5,//請求量閾值
		SleepWindow:10000, //熔斷開啟多久嘗試發起一次請求
		ErrorPercentThreshold:1, //誤差閾值百分比
	})
	breakerMw:=circuitbreaker.Hystrix(commandName) //定義熔斷器中間件
	options := etcdv3.ClientOptions{
		DialTimeout:   time.Second * 3,
		DialKeepAlive: time.Second * 3,
	}
	//連接注冊中心
	client, err := etcdv3.NewClient(ctx, []string{etcdServer}, options)
	if err != nil {
		panic(err)
	}
	logger := log.NewNopLogger()
	//創建實例管理器, 此管理器會Watch監聽etc中prefix的目錄變化更新緩存的服務實例數據
	instancer, err := etcdv3.NewInstancer(client, prefix, logger)
	if err != nil {
		panic(err)
	}
	//創建端點管理器, 此管理器根據Factory和監聽的到實例創建endPoint并訂閱instancer的變化動態更新Factory創建的endPoint
	endpointer := sd.NewEndpointer(instancer, reqFactory, logger) //reqFactory自定義的函數,主要用于端點層(endpoint)接受并顯示數據
	//創建負載均衡器
	balancer := lb.NewRoundRobin(endpointer)

	/**
	我們可以通過負載均衡器直接獲取請求的endPoint,發起請求
	reqEndPoint,_ := balancer.Endpoint()
	*/

	/**
	也可以通過retry定義嘗試次數進行請求
	*/
	reqEndPoint := lb.Retry(3, 100*time.Second, balancer) //請求次數為3,時間為10S(時間需要多于服務器限流時間3s)

	//增加熔斷中間件
	reqEndPoint=breakerMw(reqEndPoint)

	//現在我們可以通過 endPoint 發起請求了
	req := struct{}{}
	for i:=0;i20;i++ {  //發生20次請求
		ctx=context.Background()
		if _, err = reqEndPoint(ctx, req); err != nil {
			//panic(err)
			fmt.Println("當前時間: ", time.Now().Format("2006-01-02 15:04:05.99"),"\t第",i+1,"次")
			fmt.Println(err)
			time.Sleep(1*time.Second)
		}
	}
}

//通過傳入的 實例地址  創建對應的請求endPoint
func reqFactory(instanceAddr string) (endpoint.Endpoint, io.Closer, error) {
	return func(ctx context.Context, request interface{}) (interface{}, error) {
		conn, err := grpc.Dial(instanceAddr, grpc.WithInsecure())
		if err != nil {
			fmt.Println(err)
			panic("connect error")
		}
		defer conn.Close()
		bookClient := book.NewBookServiceClient(conn)
		bi, _ := bookClient.GetBookInfo(context.Background(), book.BookInfoParams{BookId: 1})
		fmt.Println("獲取書籍詳情")
		fmt.Println("bookId: 1", " => ", "bookName:", bi.BookName)
		fmt.Println("請求服務成功: ", instanceAddr,"當前時間為:",time.Now().Format("2006-01-02 15:04:05.99"))
		/*bl, _ := bookClient.GetBookList(context.Background(), book.BookListParams{Page: 1, Limit: 10})
		fmt.Println("獲取書籍列表")
		for _, b := range bl.BookList {
			fmt.Println("bookId:", b.BookId, " => ", "bookName:", b.BookName)
		}*/
		return nil, nil
	}, nil, nil
}
3、運行及分析
直接運行Client端(不用啟動etcd、Server),效果如下:
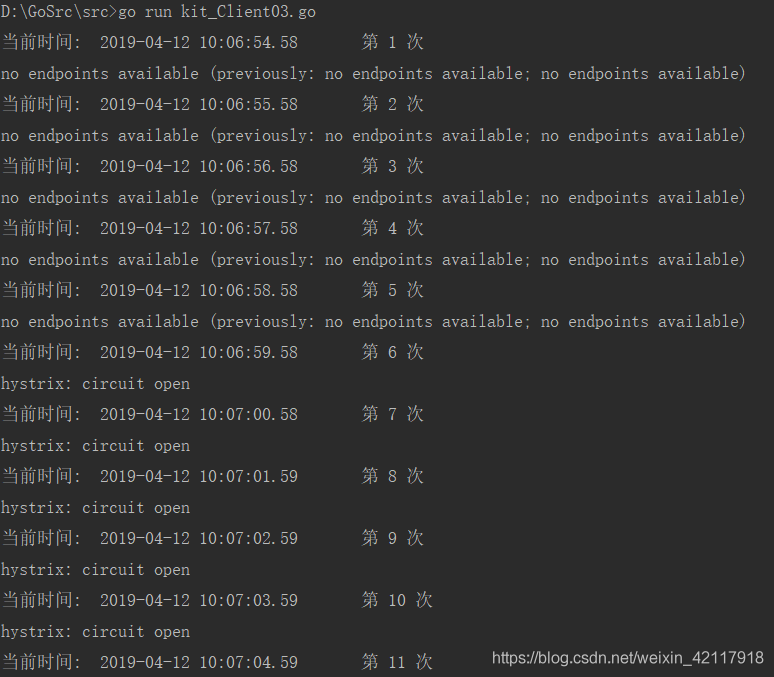
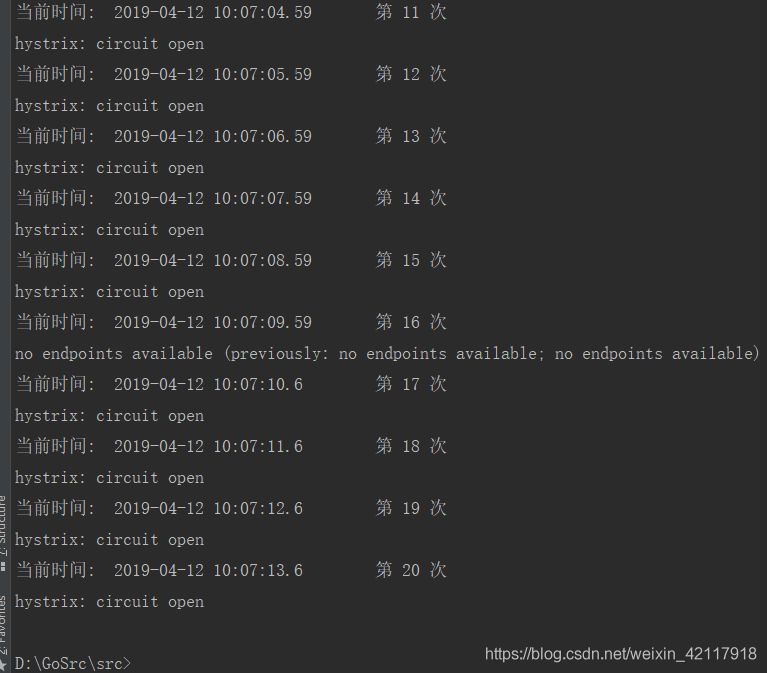
通過上面的輸出記錄可以驗證我們的配置:
1、 前5條波動期內的錯誤,沒有觸發circuit開啟(RequestVolumeThreshold:5,//請求量閾值)
2、 circuit開啟后請求熔斷生效(輸出內容:hystrix: circuit open)
3、 circuit開啟10S后,SleepWindow測試發起請求設置生效(第16次輸出的內容;設置:SleepWindow:10000, //熔斷開啟多久嘗試發起一次請求)
以上為個人經驗,希望能給大家一個參考,也希望大家多多支持腳本之家。如有錯誤或未考慮完全的地方,望不吝賜教。
您可能感興趣的文章:- 利用go-kit組件進行服務注冊與發現和健康檢查的操作
- Goland 斷點調試Debug的操作
- golang中的空slice案例
- Go語言切片前或中間插入項與內置copy()函數詳解
- golang中切片copy復制和等號復制的區別介紹
- go語言中切片與內存復制 memcpy 的實現操作
- Go語言中的UTF-8實現
