本人之前寫了一套基于unnitest框架的UI自動化框架,但是發現了pytest框架之后覺得unnitest太low,現在重頭開始學pytest框架,一邊學習一邊記錄,和大家分享,話不多說,那就先從pytest框架的精髓fixture說起吧!
簡介:
fixture區別于unnitest的傳統單元測試(setup/teardown)有顯著改進:
1.有獨立的命名,并通過聲明它們從測試函數、模塊、類或整個項目中的使用來激活。
2.按模塊化的方式實現,每個fixture都可以互相調用。
3.fixture的范圍從簡單的單元測試到復雜的功能測試,可以對fixture配置參數,或者跨函數function,類class,模塊module或整個測試session范圍。
(很重要!!!)(很重要!!!)(很重要!!!)
謹記:當我們使用pytest框架寫case的時候,一定要拿它的命令規范去case,這樣框架才能識別到哪些case需要執行,哪些不需要執行。
用例設計原則
文件名以test_*.py文件和*_test.py
以test_開頭的函數
以Test開頭的類
以test_開頭的方法
fixture可以當做參數傳入
定義fixture跟定義普通函數差不多,唯一區別就是在函數上加個裝飾器@pytest.fixture(),fixture命名不要以test開頭,跟用例區分開。fixture是有返回值得,沒有返回值默認為None。用例調用fixture的返回值,直接就是把fixture的函數名稱當做變量名稱。
ex:
import pytest

@pytest.fixture()
def test1():
    a = 'leo'
    return a


def test2(test1):
    assert test1 == 'leo'


if __name__ == '__main__':
    pytest.main('-q test_fixture.py')
輸出:
============================= test session starts =============================
platform win32 -- Python 3.7.0, pytest-4.0.2, py-1.7.0, pluggy-0.8.0
rootdir: C:\Program Files\PycharmProjects\exercise, inifile:collected 1 item
test_fixture.py . [100%]
========================== 1 passed in 0.02 seconds ===========================
Process finished with exit code 0
使用多個fixture
如果用例需要用到多個fixture的返回數據,fixture也可以返回一個元祖,list或字典,然后從里面取出對應數據。
ex:
import pytest

@pytest.fixture()
def test1():
    a = 'leo'
    b = '123456'
    print('傳出a,b')
    return (a, b)


def test2(test1):
    u = test1[0]
    p = test1[1]
    assert u == 'leo'
    assert p == '123456'
    print('元祖形式正確')


if __name__ == '__main__':
    pytest.main('-q test_fixture.py')


輸出結果:
platform win32 -- Python 3.7.0, pytest-4.0.2, py-1.7.0, pluggy-0.8.0
rootdir: C:\Program Files\PycharmProjects\exercise, inifile:collected 1 item

test_fixture.py 傳出a,b
.元祖形式正確
                                                        [100%]

========================== 1 passed in 0.02 seconds ===========================
Process finished with exit code 0
當然也可以分成多個fixture,然后在用例中傳多個fixture參數
import pytest


@pytest.fixture()
def test1():
    a = 'leo'
    print('\n傳出a')
    return a


@pytest.fixture()
def test2():
    b = '123456'
    print('傳出b')
    return b


def test3(test1, test2):
    u = test1
    p = test2
    assert u == 'leo'
    assert p == '123456'
    print('傳入多個fixture參數正確')


if __name__ == '__main__':
    pytest.main('-q test_fixture.py')


輸出結果:
============================= test session starts =============================
platform win32 -- Python 3.7.0, pytest-4.0.2, py-1.7.0, pluggy-0.8.0
rootdir: C:\Program Files\PycharmProjects\exercise, inifile:collected 1 item

test_fixture.py
傳出a
傳出b
.傳入多個fixture參數正確
fixture互相調用
import pytest


@pytest.fixture()
def test1():
    a = 'leo'
    print('\n傳出a')
    return a


def test2(test1):
    assert test1 == 'leo'
    print('fixture傳參成功')


if __name__ == '__main__':
    pytest.main('-q test_fixture.py')


輸出結果:
platform win32 -- Python 3.7.0, pytest-4.0.2, py-1.7.0, pluggy-0.8.0
rootdir: C:\Program Files\PycharmProjects\exercise, inifile:collected 1 item

test_fixture.py
傳出a
.fixture傳參成功
                                                        [100%]

========================== 1 passed in 0.03 seconds ===========================
Process finished with exit code 0
介紹完了fixture的使用方式,現在介紹一下fixture的作用范圍(scope)
fixture的作用范圍
fixture里面有個scope參數可以控制fixture的作用范圍:session>module>class>function
-function:每一個函數或方法都會調用
-class:每一個類調用一次,一個類中可以有多個方法
-module:每一個.py文件調用一次,該文件內又有多個function和class
-session:是多個文件調用一次,可以跨.py文件調用,每個.py文件就是module
fixture源碼詳解
fixture(scope='function',params=None,autouse=False,ids=None,name=None):
scope:有四個級別參數"function"(默認),"class","module","session"
params:一個可選的參數列表,它將導致多個參數調用fixture功能和所有測試使用它。
autouse:如果True,則為所有測試激活fixture func可以看到它。如果為False則顯示需要參考來激活fixture
ids:每個字符串id的列表,每個字符串對應于params這樣他們就是測試ID的一部分。如果沒有提供ID它們將從params自動生成
name:fixture的名稱。這默認為裝飾函數的名稱。如果fixture在定義它的統一模塊中使用,夾具的功能名稱將被請求夾具的功能arg遮蔽,解決這個問題的一種方法時將裝飾函數命令"fixture_fixturename>"然后使用"@pytest.fixture(name='fixturename>')"。
具體闡述一下scope四個參數的范圍
scope="function"
@pytest.fixture()如果不寫參數,參數就是scope="function",它的作用范圍是每個測試用例來之前運行一次,銷毀代碼在測試用例之后運行。
import pytest


@pytest.fixture()
def test1():
    a = 'leo'
    print('\n傳出a')
    return a


@pytest.fixture(scope='function')
def test2():
    b = '男'
    print('\n傳出b')
    return b


def test3(test1):
    name = 'leo'
    print('找到name')
    assert test1 == name


def test4(test2):
    sex = '男'
    print('找到sex')
    assert test2 == sex


if __name__ == '__main__':
    pytest.main('-q test_fixture.py')


輸出結果:

platform win32 -- Python 3.7.0, pytest-4.0.2, py-1.7.0, pluggy-0.8.0
rootdir: C:\Program Files\PycharmProjects\exercise, inifile:collected 2 items

test_fixture.py
傳出a
.找到name

傳出b
.找到sex
                                                       [100%]

========================== 2 passed in 0.04 seconds ===========================
放在類中實現結果也是一樣的
import pytest


@pytest.fixture()
def test1():
    a = 'leo'
    print('\n傳出a')
    return a


@pytest.fixture(scope='function')
def test2():
    b = '男'
    print('\n傳出b')
    return b


class TestCase:
    def test3(self, test1):
        name = 'leo'
        print('找到name')
        assert test1 == name

    def test4(self, test2):
        sex = '男'
        print('找到sex')
        assert test2 == sex


if __name__ == '__main__':
    pytest.main(['-s', 'test_fixture.py'])

輸出結果:

platform win32 -- Python 3.7.0, pytest-4.0.2, py-1.7.0, pluggy-0.8.0
rootdir: C:\Program Files\PycharmProjects\exercise, inifile:collected 2 items

test_fixture.py
傳出a
.找到name

傳出b
.找到sex
                                                       [100%]

========================== 2 passed in 0.03 seconds ===========================
Process finished with exit code 0
scope="class"
fixture為class級別的時候,如果一個class里面有多個用例,都調用了次fixture,那么此fixture只在此class里所有用例開始前執行一次。
import pytest


@pytest.fixture(scope='class')
def test1():
    b = '男'
    print('傳出了%s, 且只在class里所有用例開始前執行一次!!!' % b)
    return b


class TestCase:
    def test3(self, test1):
        name = '男'
        print('找到name')
        assert test1 == name

    def test4(self, test1):
        sex = '男'
        print('找到sex')
        assert test1 == sex


if __name__ == '__main__':
    pytest.main(['-s', 'test_fixture.py'])

輸出結果:
platform win32 -- Python 3.7.0, pytest-4.0.2, py-1.7.0, pluggy-0.8.0
rootdir: C:\Program Files\PycharmProjects\exercise, inifile:collected 2 items

test_fixture.py 傳出了男, 且只在class里所有用例開始前執行一次!!!
.找到name
.找到sex
                                                       [100%]

========================== 2 passed in 0.05 seconds ===========================
Process finished with exit code 0
scope="module"
fixture為module時,在當前.py腳本里面所有用例開始前只執行一次。
import pytest
##test_fixture.py

@pytest.fixture(scope='module')
def test1():
    b = '男'
    print('傳出了%s, 且在當前py文件下執行一次!!!' % b)
    return b


def test3(test1):
    name = '男'
    print('找到name')
    assert test1 == name


class TestCase:

    def test4(self, test1):
        sex = '男'
        print('找到sex')
        assert test1 == sex


if __name__ == '__main__':
    pytest.main(['-s', 'test_fixture.py'])


輸出結果:
============================= test session starts =============================
platform win32 -- Python 3.7.0, pytest-4.0.2, py-1.7.0, pluggy-0.8.0
rootdir: C:\Program Files\PycharmProjects\exercise, inifile:collected 2 items

test_fixture.py 傳出了男, 且在當前py文件下執行一次!!!
.找到sex
.找到name
                                                       [100%]

========================== 2 passed in 0.03 seconds ===========================
Process finished with exit code 0
scope="session"
fixture為session級別是可以跨.py模塊調用的,也就是當我們有多個.py文件的用例的時候,如果多個用例只需調用一次fixture,那就可以設置為scope="session",并且寫到conftest.py文件里。
conftest.py文件名稱時固定的,pytest會自動識別該文件。放到項目的根目錄下就可以全局調用了,如果放到某個package下,那就在改package內有效。
文件目錄為

import pytest
# conftest.py

@pytest.fixture(scope='session')
def test1():
    sex = '男'
    print('獲取到%s' % sex)
    return sex
import pytest
# test_fixture.py

def test3(test1):
    name = '男'
    print('找到name')
    assert test1 == name


if __name__ == '__main__':
    pytest.main(['-s', 'test_fixture.py'])
import pytest
# test_fixture1.py

class TestCase:

    def test4(self, test1):
        sex = '男'
        print('找到sex')
        assert test1 == sex


if __name__ == '__main__':
    pytest.main(['-s', 'test_fixture1.py'])
如果需要同時執行兩個py文件,可以在cmd中在文件py文件所在目錄下執行命令:pytest -s test_fixture.py test_fixture1.py
執行結果為:
================================================= test session starts =================================================
platform win32 -- Python 3.7.0, pytest-4.0.2, py-1.7.0, pluggy-0.8.0
rootdir: C:\Program Files\PycharmProjects\exercise, inifile:
collected 2 items
test_fixture.py 獲取到男
找到name
.
test_fixture1.py 找到sex
.
============================================== 2 passed in 0.05 seconds ===============================================
調用fixture的三種方法
1.函數或類里面方法直接傳fixture的函數參數名稱
import pytest
# test_fixture1.py


@pytest.fixture()
def test1():
    print('\n開始執行function')


def test_a(test1):
    print('---用例a執行---')


class TestCase:

    def test_b(self, test1):
        print('---用例b執行')

輸出結果:
test_fixture1.py
開始執行function
.---用例a執行---

開始執行function
.---用例b執行
                                                      [100%]

========================== 2 passed in 0.05 seconds ===========================
Process finished with exit code 0
2.使用裝飾器@pytest.mark.usefixtures()修飾需要運行的用例
import pytest
# test_fixture1.py


@pytest.fixture()
def test1():
    print('\n開始執行function')


@pytest.mark.usefixtures('test1')
def test_a():
    print('---用例a執行---')


@pytest.mark.usefixtures('test1')
class TestCase:

    def test_b(self):
        print('---用例b執行---')

    def test_c(self):
        print('---用例c執行---')


if __name__ == '__main__':
    pytest.main(['-s', 'test_fixture1.py'])

輸出結果:
platform win32 -- Python 3.7.0, pytest-4.0.2, py-1.7.0, pluggy-0.8.0
rootdir: C:\Program Files\PycharmProjects\exercise, inifile:collected 3 items

test_fixture1.py
開始執行function
.---用例a執行---

開始執行function
.---用例b執行---

開始執行function
.---用例c執行---
                                                     [100%]

========================== 3 passed in 0.06 seconds ===========================
Process finished with exit code 0
疊加usefixtures
如果一個方法或者一個class用例想要同時調用多個fixture,可以使用@pytest.mark.usefixture()進行疊加。注意疊加順序,先執行的放底層,后執行的放上層。
import pytest
# test_fixture1.py


@pytest.fixture()
def test1():
    print('\n開始執行function1')


@pytest.fixture()
def test2():
    print('\n開始執行function2')


@pytest.mark.usefixtures('test1')
@pytest.mark.usefixtures('test2')
def test_a():
    print('---用例a執行---')


@pytest.mark.usefixtures('test2')
@pytest.mark.usefixtures('test1')
class TestCase:

    def test_b(self):
        print('---用例b執行---')

    def test_c(self):
        print('---用例c執行---')


if __name__ == '__main__':
    pytest.main(['-s', 'test_fixture1.py'])


輸出結果:
============================= test session starts =============================
platform win32 -- Python 3.7.0, pytest-4.0.2, py-1.7.0, pluggy-0.8.0
rootdir: C:\Program Files\PycharmProjects\exercise, inifile:collected 3 items

test_fixture1.py
開始執行function2

開始執行function1
.---用例a執行---

開始執行function1

開始執行function2
.---用例b執行---

開始執行function1

開始執行function2
.---用例c執行---
                                                     [100%]

========================== 3 passed in 0.03 seconds ===========================
Process finished with exit code 0
usefixtures與傳fixture區別
如果fixture有返回值,那么usefixture就無法獲取到返回值,這個是裝飾器usefixture與用例直接傳fixture參數的區別。
當fixture需要用到return出來的參數時,只能講參數名稱直接當參數傳入,不需要用到return出來的參數時,兩種方式都可以。
fixture自動使用autouse=True
當用例很多的時候,每次都傳這個參數,會很麻煩。fixture里面有個參數autouse,默認是False沒開啟的,可以設置為True開啟自動使用fixture功能,這樣用例就不用每次都去傳參了
autouse設置為True,自動調用fixture功能
import pytest
# test_fixture1.py


@pytest.fixture(scope='module', autouse=True)
def test1():
    print('\n開始執行module')


@pytest.fixture(scope='class', autouse=True)
def test2():
    print('\n開始執行class')


@pytest.fixture(scope='function', autouse=True)
def test3():
    print('\n開始執行function')


def test_a():
    print('---用例a執行---')


def test_d():
    print('---用例d執行---')


class TestCase:

    def test_b(self):
        print('---用例b執行---')

    def test_c(self):
        print('---用例c執行---')


if __name__ == '__main__':
    pytest.main(['-s', 'test_fixture1.py'])


輸出結果:
============================= test session starts =============================
platform win32 -- Python 3.7.0, pytest-4.0.2, py-1.7.0, pluggy-0.8.0
rootdir: C:\Program Files\PycharmProjects\exercise, inifile:collected 4 items

test_fixture1.py
開始執行module

開始執行class

開始執行function
.---用例a執行---

開始執行class

開始執行function
.---用例d執行---

開始執行class

開始執行function
.---用例b執行---

開始執行function
.---用例c執行---
                                                    [100%]
conftest.py的作用范圍
一個工程下可以建多個conftest.py的文件,一般在工程根目錄下設置的conftest文件起到全局作用。在不同子目錄下也可以放conftest.py的文件,作用范圍只能在改層級以及以下目錄生效。
項目實例:
目錄結構:
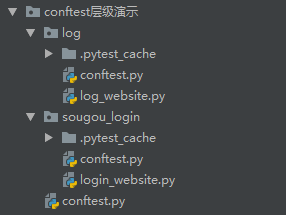
1.conftest在不同的層級間的作用域不一樣
# conftest層級展示/conftest.py

import pytest


@pytest.fixture(scope='session', autouse=True)
def login():
    print('----準備登錄----')


# conftest層級展示/sougou_login/conftest
import pytest


@pytest.fixture(scope='session', autouse=True)
def bai_du():
    print('-----登錄百度頁面-----')


# conftest層級展示/sougou_login/login_website
import pytest


class TestCase:
    def test_login(self):
        print('hhh,成功登錄百度')


if __name__ == '__main__':
    pytest.main(['-s', 'login_website.py'])


輸出結果:

============================= test session starts =============================
platform win32 -- Python 3.7.0, pytest-4.0.2, py-1.7.0, pluggy-0.8.0
rootdir: C:\Program Files\PycharmProjects\conftest層級演示\sougou_login, inifile:collected 1 item

login_website.py ----準備登錄----
-----登錄百度頁面-----
.hhh,成功登錄百度
                                                       [100%]

========================== 1 passed in 0.03 seconds ===========================
Process finished with exit code 0
2.conftest是不能跨模塊調用的(這里沒有使用模塊調用)
# conftest層級演示/log/contfest.py
import pytest


@pytest.fixture(scope='function', autouse=True)
def log_web():
    print('打印頁面日志成功')


# conftest層級演示/log/log_website.py
import pytest


def test_web():
    print('hhh,成功一次打印日志')


def test_web1():
    print('hhh,成功兩次打印日志')


if __name__ == '__main__':
    pytest.main(['-s', 'log_website.py'])


輸出結果:
============================= test session starts =============================
platform win32 -- Python 3.7.0, pytest-4.0.2, py-1.7.0, pluggy-0.8.0
rootdir: C:\Program Files\PycharmProjects\conftest層級演示\log, inifile:
collected 2 items

log_website.py ----準備登錄----
打印頁面日志成功
hhh,成功一次打印日志
.打印頁面日志成功
hhh,成功兩次打印日志
.

========================== 2 passed in 0.02 seconds ===========================
到此這篇關于pytest框架之fixture詳細使用詳解的文章就介紹到這了,更多相關pytest fixture內容請搜索腳本之家以前的文章或繼續瀏覽下面的相關文章希望大家以后多多支持腳本之家!
您可能感興趣的文章:- python pytest進階之fixture詳解
- pytest進階教程之fixture函數詳解
- Python 測試框架unittest和pytest的優劣
- Python自動化測試pytest中fixtureAPI簡單說明
