目錄
- 一���、主要目的
- 二、前期準備
- 三�����、思路分析
- 四��、具體源代碼
- 五�、部分成果展示
- 六����、總結
一、主要目的
最近在玩Python網絡爬蟲,然后接觸到了selenium這個模塊����,就捉摸著搞點有意思的���,順便記錄一下自己的學習過程�����。
二、前期準備
- 操作系統:windows10
- 瀏覽器:谷歌瀏覽器(Google Chrome)
- 瀏覽器驅動:chromedriver.exe (我的版本—>89.0.4389.128 )
- 程序中我使用的模塊
import csv
import os
import re
import json
import time

import requests
from selenium.webdriver import Chrome
from selenium.webdriver.remote.webelement import WebElement
from selenium.webdriver.common.by import By
from selenium.webdriver.support import ui
from selenium.webdriver.support import expected_conditions
from lxml import etree

chrome = Chrome(executable_path='chromedriver')
- 用的的第三方包均可用 pip install 進行安裝
- 上面代碼中的最后一行表示創建一個瀏覽器對象
三、思路分析
1.大致看了一下網站主頁��,需要先登錄后才能進行信息的獲取����,所以只能先模擬登錄。
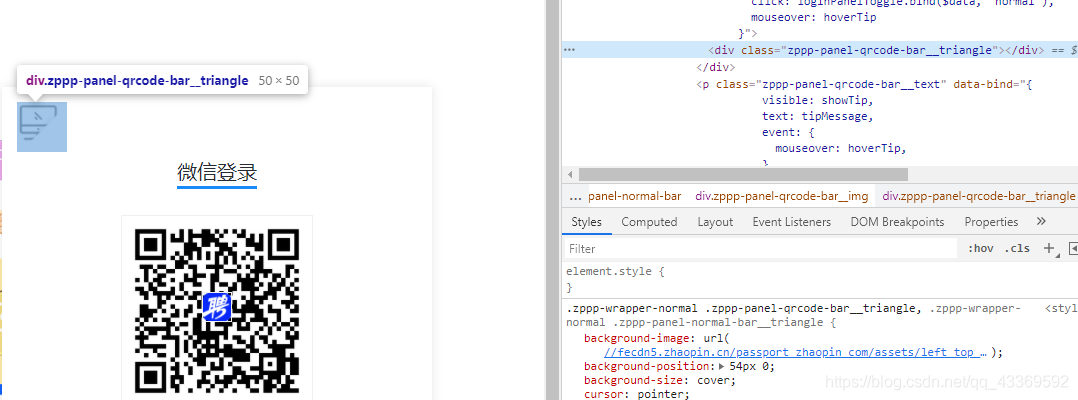
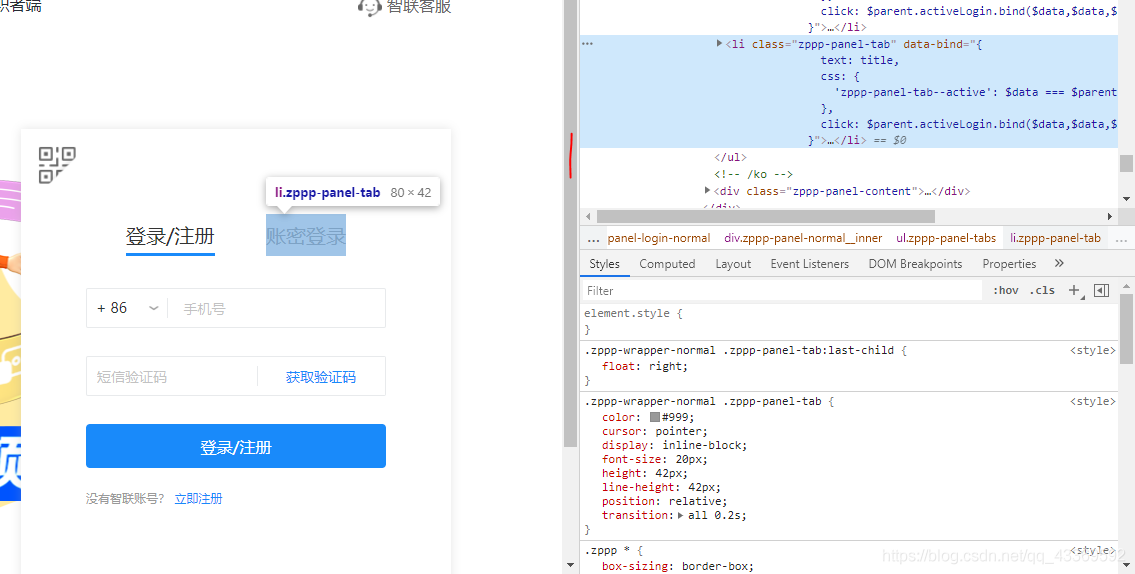
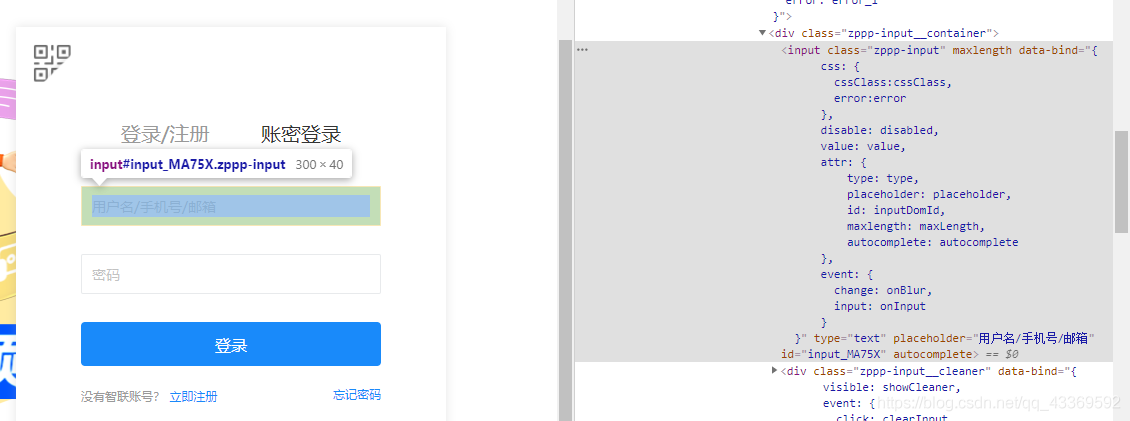
進入登錄頁面的時候是顯示二維碼登錄�,我們不用這個�����,因為確實不怎么方便,我們通過模擬點擊頁面上的按鈕進入到賬號、密碼登錄的頁面輸入進行登錄。下面是如何驅動瀏覽器進行上述的一系列操作⬇⬇⬇⬇⬇⬇
# 獲取登錄頁面
chrome.get(url)
# 找出賬號密碼登錄的頁面
chrome.find_element_by_class_name('zppp-panel-qrcode-bar__triangle').click()
chrome.find_element_by_xpath('//div[@class="zppp-panel-normal__inner"]/ul/li[2]').click()
# 找到賬戶密碼的交互接口并進行輸入
user_name = chrome.find_elements_by_xpath('//div[@class="zppp-input__container"]/input')[0]
pass_word = chrome.find_elements_by_xpath('//div[@class="zppp-input__container"]/input')[1]
# 進行需要登錄的賬號密碼輸入
user_name.send_keys('**********')
pass_word.send_keys('***********')
# 輸入完成后點擊登錄
chrome.find_element_by_class_name('zppp-submit').click()

# 此處手動實現滑塊驗證
# 動動你的小鼠標
2.登陸后大致看了一下主頁決定先從城市開始爬,在它的原文件中分析出它的位置����,如圖↓
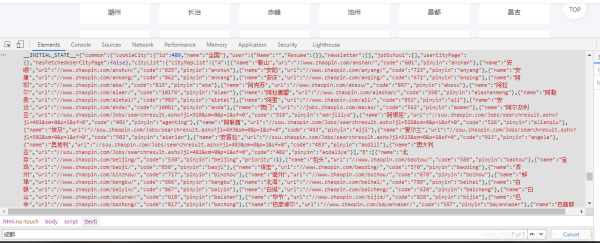
我用的是requests請求獲取到網頁原文件���,再使用正則匹配到我們需要的內容(就是上圖中那一坨紅色的↑)�����,之后再進行一系列的解析獲取到每個城市與其對應的url ⬇⬇⬇⬇⬇⬇
resp = requests.get(url, headers=headers)
if resp.status_code == 200:
html = resp.text
json_data = re.search(r'script>__INITIAL_STATE__=(.*?)/script>', html).groups()[0]
data = json.loads(json_data)
cityMapList = data['cityList']['cityMapList'] # dict
for letter, citys in cityMapList.items():
# print(f'-----{letter}-------')
for city in citys: # citys 是個列表�����,里面嵌套的字典
'''
{
'name': '鞍山',
'url': '//www.zhaopin.com/anshan/',
'code': '601',
'pinyin': 'anshan'
}
'''
city_name = city['name']
city_url = 'https:' + city['url']
此處我們獲取的是所有的城市和它url�,如果都要進行爬取的話數據量略大��,因此我們可以篩選出需要爬取的城市減輕工作量�,反正爬取城市我們想怎么改就怎么改哈哈哈哈哈�����。
3.接下來我們就可以進行工作的查找了�����,既然我們用的是Python來爬取的��,那就查詢Python相關的工作吧。
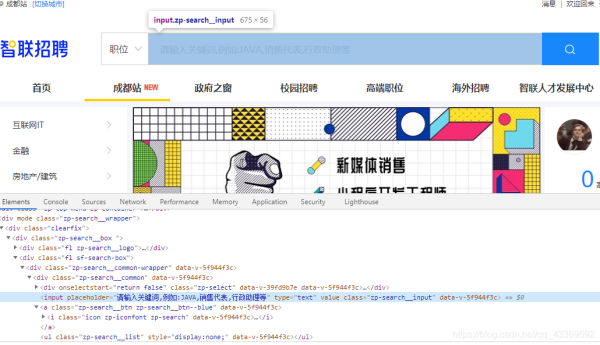
首先還是要找到輸入搜索信息的框框并找出它的接口,然后進行輸入(這里輸入的是Python)���,輸入完成后找到右邊的搜索按鈕(就是那個放大鏡)進行點擊操作,下面是模擬瀏覽器操作的代碼實現⬇⬇⬇⬇⬇
# 根據class_name 查詢WebElement找出輸入的位置
input_seek: WebElement = chrome.find_element_by_class_name('zp-search__input')
input_seek.send_keys('Python')  # 輸入Python
click: WebElement =
    # 找出搜索	按鈕并點擊
    chrome.find_element_by_xpath('//div[@class="zp-search__common"]//a')
click.click()

chrome.switch_to.window(chrome.window_handles[1])
這里就有一個需要注意的地方了:在輸入Python點擊搜索按鈕后會彈出一個新的窗口,而驅動瀏覽器的 程序還在第一個窗口���,因此需要使用 swiitch_to_window(chrome.window_handles[n]) --n表示目標窗口的 位置,最開始的第一個窗口是0> 方法進行窗口的切換。
4.數據的解析和提取
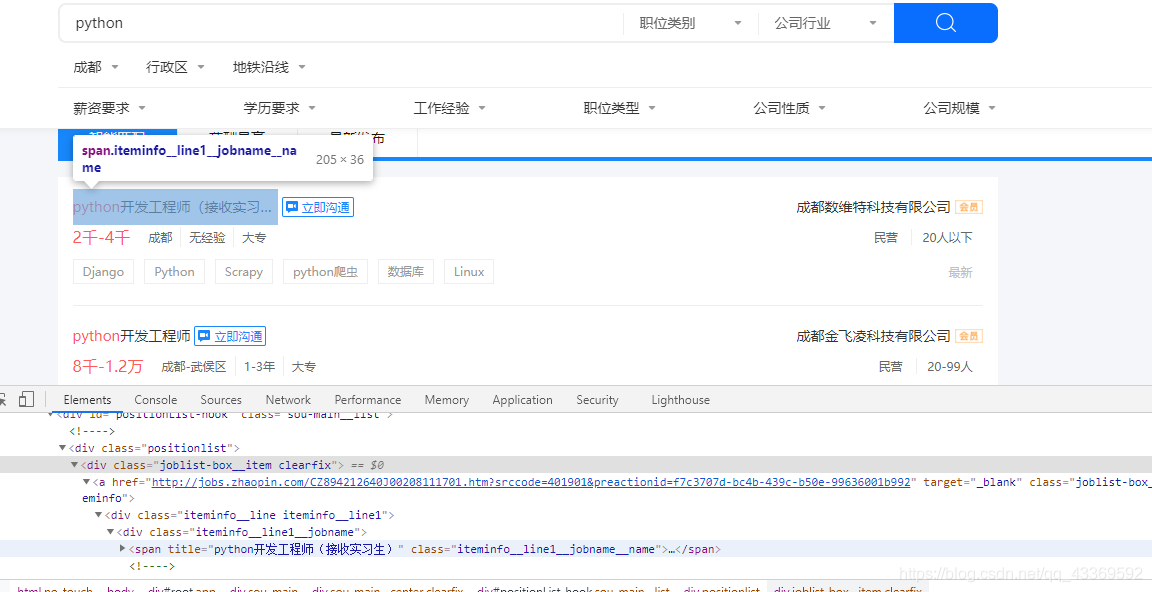
很明顯可以看出需要的信息都在 class="positionlist "下,進一步分析可知數據都在 a標簽下,接下來就可以使用Xpath進行數據的提取⬇⬇⬇⬇⬇
root = etree.HTML(html)
    divs = root.xpath('//div[@class="positionlist"]')  # element對象
    for div in divs:
        # 崗位     # 里面對應的是一個個列表
        position = div.xpath('.//a//div[@class="iteminfo__line1__jobname"]/span[1]')
         # 公司
        company = div.xpath('//a//div[@class="iteminfo__line1__compname"]/span/text()')
        # 薪資
        money = div.xpath('.//a//div[@class="iteminfo__line2__jobdesc"]/p/text()')
         # 位置
        city = div.xpath('//a//div[@class="iteminfo__line2__jobdesc"]/ul/li[1]/text()')
        # 經驗
        experience = 				              div.xpath('.//a//div[@class="iteminfo__line2__jobdesc"]/ul/li[2]/text()')
        # 學歷
        education =    div.xpath('.//a//div[@class="iteminfo__line2__jobdesc"]/ul/li[3]/text()')
         # 規模
        scale = div.xpath('.//a//div[@class="iteminfo__line2__compdesc"]/span[1]/text()')
         # 人數
        people = div.xpath('.//a//div[@class="iteminfo__line2__compdesc"]/span[2]/text()')
5.獲取下一頁
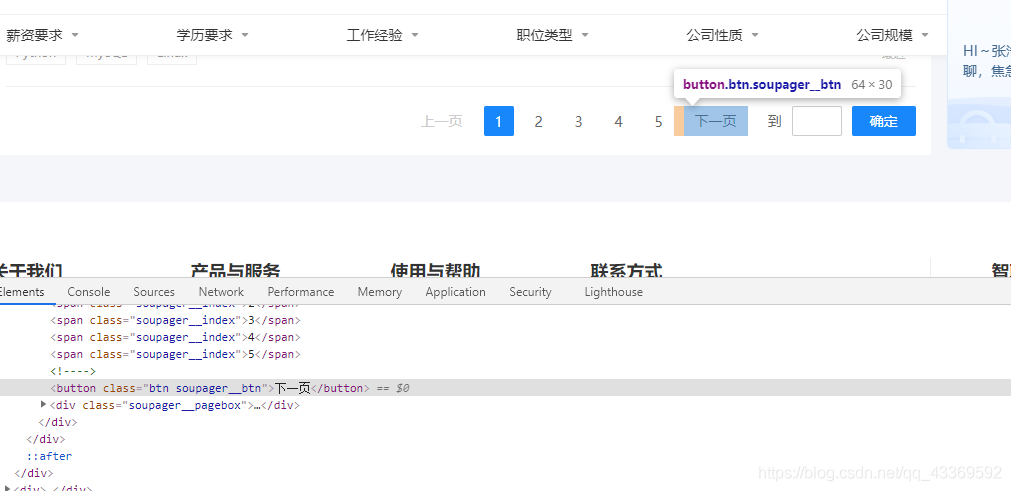
找到下一頁按鈕并模擬瀏覽器進行點擊���,獲取到每一頁所有的數據。
四、具體源代碼
import csv
import os
import re
import json
import time
import requests
from selenium.webdriver import Chrome
from selenium.webdriver.remote.webelement import WebElement
from selenium.webdriver.common.by import By
from selenium.webdriver.support import ui
from selenium.webdriver.support import expected_conditions
from lxml import etree
chrome = Chrome(executable_path='chromedriver')
# 模擬登錄
def login(url):
# 獲取登錄頁面
chrome.get(url)
# 找出賬號密碼登錄的頁面
chrome.find_element_by_class_name('zppp-panel-qrcode-bar__triangle').click()
chrome.find_element_by_xpath('//div[@class="zppp-panel-normal__inner"]/ul/li[2]').click()
# 找到賬戶密碼的交互接口并進行輸入
user_name = chrome.find_elements_by_xpath('//div[@class="zppp-input__container"]/input')[0]
pass_word = chrome.find_elements_by_xpath('//div[@class="zppp-input__container"]/input')[1]
# 此處輸入登錄智聯招聘的賬號密碼
user_name.send_keys('***********')
pass_word.send_keys('**********')
# 輸入完成后點擊登錄
chrome.find_element_by_class_name('zppp-submit').click()
# 此處手動實現滑塊驗證
# 動動手指滑一劃完成登錄
time.sleep(10)
get_allcity('https://www.zhaopin.com/citymap')
# 在登錄狀態下進行所有城市信息的獲取
def get_allcity(url):
resp = requests.get(url, headers=headers)
if resp.status_code == 200:
html = resp.text
json_data = re.search(r'script>__INITIAL_STATE__=(.*?)/script>', html).groups()[0]
data = json.loads(json_data)
cityMapList = data['cityList']['cityMapList'] # dict
for letter, citys in cityMapList.items():
# print(f'-----{letter}-------')
for city in citys: # citys 是個列表���,里面嵌套的字典
'''
{
'name': '鞍山',
'url': '//www.zhaopin.com/anshan/',
'code': '601',
'pinyin': 'anshan'
}
'''
city_name = city['name']
city_url = 'https:' + city['url']
# 篩選城市
query_citys = ('成都')
if city_name in query_citys:
print(f'正在獲取{city_name}的信息')
get_city_job(city_url)
time.sleep(3)
else:
# print(f'{city_name} 不在搜索范圍內!')
pass
else:
print('網頁獲取失敗')
def get_city_job(url):
chrome.get(url) # 打開城市信息
# 根據class_name 查詢WebElement找出輸入的位置
input_seek: WebElement = chrome.find_element_by_class_name('zp-search__input')
input_seek.send_keys('Python') # 輸入Python
click: WebElement = chrome.find_element_by_xpath('//div[@class="zp-search__common"]//a') # 找出搜索按鈕并點擊
click.click()
# 切換到第二個頁面
chrome.switch_to.window(chrome.window_handles[1])
time.sleep(1)
time.sleep(1)
# 等待class_name為“sou-main__list” div元素出現
ui.WebDriverWait(chrome, 30).until(
expected_conditions.visibility_of_all_elements_located((By.CLASS_NAME, 'sou-main__list')),
'查找的元素一直沒有出現'
)
# 判斷當前查詢結果是否不存在
no_content = chrome.find_elements_by_class_name('positionlist')
if not no_content:
print('當前城市未查找到Python崗位')
else:
# 提取查找結果
parse(chrome.page_source)
def parse(html):
root = etree.HTML(html)
divs = root.xpath('//div[@class="positionlist"]') # element對象
items = {}
for div in divs:
# 崗位
position = div.xpath('.//a//div[@class="iteminfo__line1__jobname"]/span[1]')
# 公司
company = div.xpath('//a//div[@class="iteminfo__line1__compname"]/span/text()')
# 薪資
money = div.xpath('.//a//div[@class="iteminfo__line2__jobdesc"]/p/text()')
# 位置
city = div.xpath('//a//div[@class="iteminfo__line2__jobdesc"]/ul/li[1]/text()')
# 經驗
experience = div.xpath('.//a//div[@class="iteminfo__line2__jobdesc"]/ul/li[2]/text()')
# 學歷
education = div.xpath('.//a//div[@class="iteminfo__line2__jobdesc"]/ul/li[3]/text()')
# 規模
scale = div.xpath('.//a//div[@class="iteminfo__line2__compdesc"]/span[1]/text()')
# 人數
people = div.xpath('.//a//div[@class="iteminfo__line2__compdesc"]/span[2]/text()')
for position_, company_, money_, city_, experience_, education_, scale_, people_ in zip(position, company,
money, city, experience,
education, scale,
people):
# title="python爬蟲工程師" 獲取它的title屬性值
string = position_.attrib.get('title')
items['position'] = string
items['company'] = company_
items['money'] = money_.strip()
items['city'] = city_
items['experience'] = experience_
items['education'] = education_
items['scale'] = scale_
items['people'] = people_
itempipeline(items)
# 獲取下一頁
next_page()
def itempipeline(items):
has_header = os.path.exists(save_csv) # 文件頭
with open(save_csv, 'a', encoding='utf8') as file:
writer = csv.DictWriter(file, fieldnames=items.keys())
if not has_header:
writer.writeheader() # 寫入文件頭
writer.writerow(items)
def next_page():
# 找到下一頁按鈕
time.sleep(0.5)
button = chrome.find_elements_by_xpath('//div[@class="soupager"]/button[@class="btn soupager__btn"]')
if not button:
print(f'獲取完畢,請在 {save_csv} 里查看!!')
exit()
else:
button[0].click() # 點擊下一頁
time.sleep(1)
parse(chrome.page_source)
if __name__ == '__main__':
n = 0
headers = {
'User-Agent': 'Mozilla/5.0 (Windows NT 10.0; WOW64) AppleWebKit/537.36 (KHTML, like Gecko) Chrome/70.0.3538.25 Safari/537.36 Core/1.70.3823.400 QQBrowser/10.7.4307.400',
'Cookie': 'aQQ_ajkguid=B4D4C2CC-2F46-D252-59D7-83356256A4DC; id58=e87rkGBclxRq9+GOJC4CAg==; _ga=GA1.2.2103255298.1616680725; 58tj_uuid=4b56b6bf-99a3-4dd5-83cf-4db8f2093fcd; wmda_uuid=0f89f6f294d0f974a4e7400c1095354c; wmda_new_uuid=1; wmda_visited_projects=%3B6289197098934; als=0; cmctid=102; ctid=15; sessid=E454865C-BA2D-040D-1158-5E1357DA84BA; twe=2; isp=true; _gid=GA1.2.1192525458.1617078804; new_uv=4; obtain_by=2; xxzl_cid=184e09dc30c74089a533faf230f39099; xzuid=7763438f-82bc-4565-9fe8-c7a4e036c3ee'
}
save_csv = 'chengdu-python.csv'
login(
'https://passport.zhaopin.com/login?bkUrl=%2F%2Fi.zhaopin.com%2Fblank%3Fhttps%3A%2F%2Fwww.zhaopin.com%2Fbeijing%2F')
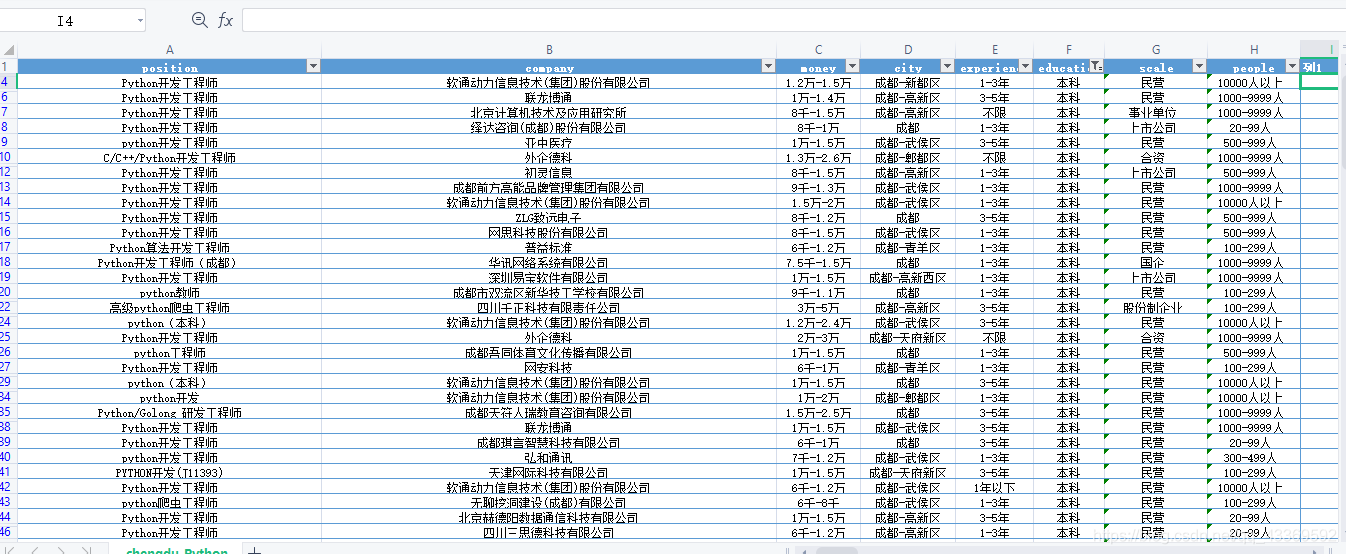
五、部分成果展示
六�����、總結
個人認為智聯的反爬還是比較友好的�,為什么呢��?因為之前在測試程序的時候模擬登錄了好幾十次�����,都是在短時間內,而且一開始比較擔心IP被封但是最后也沒出什么問題���。還有就是selenium受網速影響比較大,等待時間設置過長吧����,會影響程序速度�,但是時間過短吧又會損數據���。
到此這篇關于python selenium實現智聯招聘數據爬取的文章就介紹到這了,更多相關selenium實現智聯招聘爬取內容請搜索腳本之家以前的文章或繼續瀏覽下面的相關文章希望大家以后多多支持腳本之家���!
您可能感興趣的文章:- 教你如何使用Python快速爬取需要的數據
- python爬取豆瓣電影TOP250數據
- python爬取鏈家二手房的數據
- Python手拉手教你爬取貝殼房源數據的實戰教程
- Python數據分析之Python和Selenium爬取BOSS直聘崗位
- python爬蟲之爬取谷歌趨勢數據
- python爬蟲之教你如何爬取地理數據
- Python爬蟲爬取全球疫情數據并存儲到mysql數據庫的步驟
- Python爬取騰訊疫情實時數據并存儲到mysql數據庫的示例代碼
- Python爬蟲之自動爬取某車之家各車銷售數據
