| 值 | 描述 |
|---|---|
| source-over | 默認。在目標圖像上顯示源圖像。 |
| source-atop | 在目標圖像頂部顯示源圖像。源圖像位于目標圖像之外的部分是不可見的。 |
| source-in | 在目標圖像中顯示源圖像。只有目標圖像內的源圖像部分會顯示,目標圖像是透明的。 |
| source-out | 在目標圖像之外顯示源圖像。只會顯示目標圖像之外源圖像部分,目標圖像是透明的。 |
| destination-over | 在源圖像上方顯示目標圖像。 |
| destination-atop | 在源圖像頂部顯示目標圖像。源圖像之外的目標圖像部分不會被顯示。 |
| destination-in | 在源圖像中顯示目標圖像。只有源圖像內的目標圖像部分會被顯示,源圖像是透明的。 |
| destination-out | 在源圖像外顯示目標圖像。只有源圖像外的目標圖像部分會被顯示,源圖像是透明的。 |
| lighter | 顯示源圖像 + 目標圖像。 |
| copy | 顯示源圖像。忽略目標圖像。 |
| xor | 使用異或操作對源圖像與目標圖像進行組合。 |
<!DOCTYPE html>
<html>
<head>
<style>
canvas
{
border:1px solid #d3d3d3;
margin-right:10px;
margin-bottom:20px;
}
</style>
</head>
<body>

<script>

var gco=new Array();
gco.push("source-atop");
gco.push("source-in");
gco.push("source-out");
gco.push("source-over");
gco.push("destination-atop");
gco.push("destination-in");
gco.push("destination-out");
gco.push("destination-over");
gco.push("lighter");
gco.push("copy");
gco.push("xor");
for (n=0;n<gco.length;n++)
    {
    document.write("<div id='p_" + n + "' style='float:left;'>" + gco[n] + ":<br>");
    var c=document.createElement("canvas");
    c.width=120;
    c.height=100;
    document.getElementById("p_" + n).appendChild(c);
    var ctx=c.getContext("2d");
    ctx.fillStyle="blue";
    ctx.fillRect(10,10,50,50);
    ctx.globalCompositeOperation=gco[n];
    ctx.beginPath();
    ctx.fillStyle="red";
    ctx.arc(50,50,30,0,2*Math.PI);
    ctx.fill();
    document.write("</div>");
    }

</script>

</body>
</html>
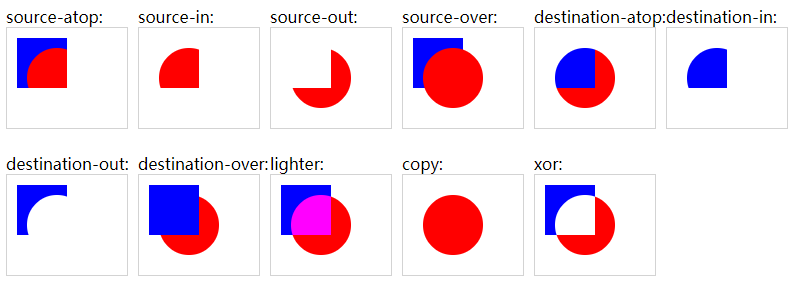
可以看出如果設置成destination-out,就可以清除canvas現有的像素點的圖像。
清除繪制到畫布上的線條(點擦除,線擦除)
在我最近實現的項目中有畫筆功能, 同時畫筆畫出的線條可以被橡皮擦擦除,有點擦除和線擦除兩種方式。
使用以上兩種方法也可以,但是如果這些線條不止繪制一次的話呢,中間有其他操作(例如繪制的內容變換一次后)那上面的方法就不容易做到了,因為要反復繪制存儲每次擦除后的數據,簡單的為了能達到該目的,可以將整個canvas畫布轉化成base64編碼的image,后面再次繪制的時候把這個image數據再繪制到canvas上,可以繼續在這個canvas上進行繪制和擦除內容。但是怎么樣也不好做到線擦除的功能了!
下面介紹另外一種存儲繪制路徑點坐標的方法去實現繪制線條后的點擦除和線擦除的功能。
首先介紹下存儲線條的數據結構,之前寫的一篇《js實現存儲對象的數據結構hashTable和list》大家可以先大致看看hash結構的實現,但是key和value快速查找的優勢需要清楚。另外在canvas畫的各種形狀和線條,我們是如何知道點擊到哪個元素哪條線?《軟件項目技術點(4)——實現點擊畫布上元素》這篇博客里有說明實現原理。
1. 線條存儲及繪制
項目中我存儲的線條hash結構的對象如下:
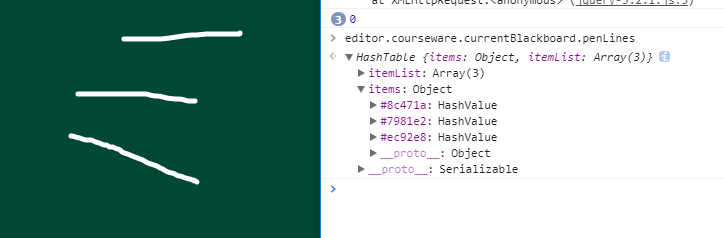
展開第一個線條key值為“#8c471a”的具體信息如下,value值其中有colorKey,lineColor,lineWidth,以及最重要的List結構的points對象,是一個存儲了該線條所有點坐標集合的List對象。

下面的一段代碼,實現了繪制該線條到畫布。使用二次貝塞爾函數使得繪制出來的線條流暢平滑沒有折痕,當只有一個點時可繪制出一個圓點。
var count = this.points.length();
                var p: Core.Point = this.points.get(0);
                if (isDrawHit) {
                    ctx.strokeStyle = this.colorKey;
                }
                else {
                    ctx.strokeStyle = this.lineColor;
                }
                ctx.lineCap = "round";
                ctx.lineJoin = 'round';//轉折的時候不出現尖角
                if (ctx.canvas.id == "hitCanvas")
                    ctx.lineWidth = this.lineWidth + eraserRadius;//擴大hit上線條的范圍,橡皮半徑
                else
                    ctx.lineWidth = this.lineWidth;
                ctx.beginPath();
                if (count >= 2) {
                    ctx.moveTo(p.x, p.y);
                    for (var i = 1; i < count - 2; i++) {
                        // p = this.points.get(i);
                        // ctx.lineTo(p.x, p.y);
                        if (this.points.get(i).x == this.points.get(i + 1).x && this.points.get(i).y == this.points.get(i + 1).y)
                            continue;
                        var c = (this.points.get(i).x + this.points.get(i + 1).x) / 2;
                        var d = (this.points.get(i).y + this.points.get(i + 1).y) / 2;
                        ctx.quadraticCurveTo(this.points.get(i).x, this.points.get(i).y, c, d); //二次貝塞曲線函數
                    }
                    // For the last 2 points
                    if (count >= 3) {
                        ctx.quadraticCurveTo(
                            this.points.get(i).x,
                            this.points.get(i).y,
                            this.points.get(i + 1).x,
                            this.points.get(i + 1).y
                        );
                    } else if (count >= 2) {
                        ctx.lineTo(this.points.get(1).x, this.points.get(1).y);
                    }
                    ctx.stroke();
                } else {
                    if (isDrawHit) {
                        ctx.fillStyle = this.colorKey;
                    }
                    else {
                        ctx.fillStyle = this.lineColor;
                    }
                    if (ctx.canvas.id == "hitCanvas")
                        var radius = this.lineWidth + eraserRadius;//擴大hit上線條的范圍,橡皮半徑
                    else
                        var radius = this.lineWidth;
                    ctx.arc(this.points.get(0).x, this.points.get(0).y, radius, 0, 2 * Math.PI);
                    ctx.fill();
                }
其中繪制到hitCanvas上的時候將lineWidth擴大加上了eraserRadius(圓形橡皮擦半徑),下圖即為繪制到hitCanvas上的colorKey顏色線條,每個線條顏色值是上圖中的key值colorKey。另外線條粗細明顯比上面的白色線條要粗很多,因為橡皮擦是個cur鼠標樣式它的半徑很大,但獲取的鼠標點擊位置還只是一個像素點坐標,所以為了擴大鼠標點到線條上的范圍將其變粗。
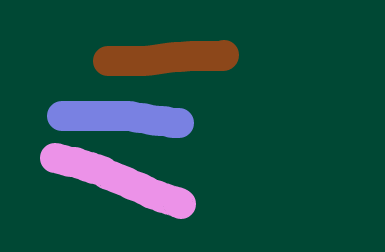
2. 線擦除和點擦除
這樣線擦除就很容易實現,只需要找到橡皮擦點到畫布上的坐標點的色值,就其從hash集合中根據colorKey刪除掉該項,即實現了刪除整條線。
點擦除就需要考慮到從兩端擦除或者從中間擦除的情況:
         if (that.isErasePoint) {
                      line.points.foreach(function (i, p) {
                          //橡皮擦距離該線條上點的距離是否在橡皮擦半徑范圍內
                          if (Math.pow(p.x - point.x, 2) + Math.pow(p.y - point.y, 2) <= Math.pow(eraserRadius, 2)) {
                              isSeparate = true;
			      //已經找到橡皮擦半徑范圍內的點,該點不存入兩個集合中的任何一個
                          } else {
                              if (isSeparate)
			      //找到后將之后的點存入另一個點集合points中
                                  points2.add(p);
                           else//找到之前將點存入點集合points1中
                                 points.add(p);
                         }
                     })
                     //遍歷完線條points上的所有點后。根據points1和points2是否為空處理點擦除后的線條
                    if (points1.length() >= 1 && points2.length() >= 1) {
		    //points1和points2都不為空,說明從中間擦除變為兩條線
                         var preLine = editor.commonEditLogic.clonePenLine(line);
                        line.points = points1;
                         var linePen = editor.bdCanvas.elementFactory.createPenLine(point, line.lineWidth, line.lineColor);
                         linePen.points = points2;
                           editor.bdCanvas.activeElement.setPenLine(linePen.colorKey, linePen);
                     }
		     else if (points1.length() == 0 && points2.length() >= 1)
		     {
		           //從一端擦除
                         line.points = points2;
                     }
		     else if (points1.length() >= 1 && points2.length() == 0)
		     {
		         //從一端擦除
                         line.points = points1;
                     }
		     else if (points1.length() == 0 && points2.length() == 0)
		     {
		            //線條上的點全部被擦除,刪除該線條
                            editor.bdCanvas.activeElement.delPenLine(line.colorKey);
			    }
                     editor.courseware.currentBlackboard.draw(false, true);
               }
到此這篇關于清除canvas畫布內容(點擦除+線擦除)的文章就介紹到這了,更多相關canvas畫布清除內容請搜索腳本之家以前的文章或繼續瀏覽下面的相關文章,希望大家以后多多支持腳本之家!

下一篇:AmazeUI 網格的實現示例