目錄
- 一、基礎環境配置
- 二�����、安裝數據庫
- 三、安裝zabbix相關組件
- 四����、配置Zabbix前端
一�����、基礎環境配置
1、關閉firewalld���、關閉selinux
##關閉firewalld
systemctl stop firewalld
systemctl disabled firewalld
##關閉selinux
setenforce 0 && sed -i.bak 's/^SELINUX=.*/SELINUX=disabled/g' /etc/selinux/config
2、配置yum倉庫
配置zabbix倉庫
wget https://repo.zabbix.com/zabbix/5.0/rhel/7/x86_64/zabbix-release-5.0-1.el7.noarch.rpm
yum install zabbix-release-5.0-1.el7.noarch.rpm
##在/etc/yum.repos.d/中查看zabbix倉庫的配置情況
[root@localhost opt]# cat /etc/yum.repos.d/zabbix.repo
[zabbix]
name=Zabbix Official Repository - $basearch
baseurl=http://repo.zabbix.com/zabbix/5.0/rhel/7/$basearch/
enabled=1
gpgcheck=1
gpgkey=file:///etc/pki/rpm-gpg/RPM-GPG-KEY-ZABBIX-A14FE591

[zabbix-frontend]
name=Zabbix Official Repository frontend - $basearch
baseurl=http://repo.zabbix.com/zabbix/5.0/rhel/7/$basearch/frontend
enabled=1
gpgcheck=1
gpgkey=file:///etc/pki/rpm-gpg/RPM-GPG-KEY-ZABBIX-A14FE591

[zabbix-debuginfo]
name=Zabbix Official Repository debuginfo - $basearch
baseurl=http://repo.zabbix.com/zabbix/5.0/rhel/7/$basearch/debuginfo/
enabled=0
gpgkey=file:///etc/pki/rpm-gpg/RPM-GPG-KEY-ZABBIX-A14FE591
gpgcheck=1

[zabbix-non-supported]
name=Zabbix Official Repository non-supported - $basearch
baseurl=http://repo.zabbix.com/non-supported/rhel/7/$basearch/
enabled=1
gpgkey=file:///etc/pki/rpm-gpg/RPM-GPG-KEY-ZABBIX
gpgcheck=1
配置mysql倉庫(zabbix監控后臺需要用到mysql存儲)
##使用清華大學的鏡像倉庫
[root@localhost opt]# cat /etc/yum.repos.d/mysql.repo
[mysql]
name=mysql
baseurl=https://mirrors.tuna.tsinghua.edu.cn/mysql/yum/mysql-5.7-community-el7-x86_64/
gpgcheck=0
enabled=1
配置centos extras倉庫(后續的安裝需要用到此倉庫的軟件包)
[root@localhost opt]# cat /etc/yum.repos.d/centos-extras.repo
[centos-extras]
name=centos-extras
baseurl=https://mirrors.tuna.tsinghua.edu.cn/centos/7.9.2009/extras/x86_64/
enabled=1
gpgcheck=0
二���、安裝數據庫
yum install mysql-community-server
啟動mysql服務
systemctl start mysql
systemctl enable mysql
在服務器初始啟動時,會發生以下情況:
服務器初始化��。
SSL 證書和密鑰文件在數據目錄中生成��。
validate_password 已安裝并啟用���。
‘root'@'localhost創建了 一個超級用戶帳戶��。超級用戶的密碼已設置并存儲在錯誤日志文件中。要顯示它�,請使用以下命令:
[root@localhost opt]# grep 'temporary password' /var/log/mysqld.log
2021-08-16T08:00:40.185610Z 1 [Note] A temporary password is generated for root@localhost: r8EaYzX_Xper
通過使用生成的臨時密碼登錄并為超級用戶帳戶設置自定義密碼��,盡快更改 root 密碼:
[root@localhost opt]# mysql -uroot -p
Enter password:
Welcome to the MySQL monitor.  Commands end with ; or \g.
Your MySQL connection id is 702
Server version: 5.7.35 MySQL Community Server (GPL)

Copyright (c) 2000, 2021, Oracle and/or its affiliates.

Oracle is a registered trademark of Oracle Corporation and/or its
affiliates. Other names may be trademarks of their respective
owners.

Type 'help;' or '\h' for help. Type '\c' to clear the current input statement.

mysql> ALTER USER 'root'@'localhost' IDENTIFIED BY 'xxxxxxx';
注意:
validate_password 默認安裝。執行的默認密碼策略validate_password要求密碼至少包含1個大寫字母�、1個小寫字母��、1個數字和1個特殊字符,并且密碼總長度至少為8個字符��。
修改一下mysql的配置文件����,提高其性能
[root@centos7 ~]# vim /etc/my.cnf
[mysqld]  //在[mysqld]下面添加下面兩行
skip_name_resolve =ON
innodb_file_per_table=ON
三、安裝zabbix相關組件
1���、安裝zabbix-server
安裝zabbix-server和zabbix-agent
yum install zabbix-server-mysql zabbix-agent
安裝zabbix-get命令行工具(用于后期在客戶端部署angent是測試監控項使用)
2、安裝frontend
啟用Red Hat Software Collections(方便安裝依賴包)
##這個軟件包在centos-extras倉庫中�,所以之前配置了centos-extras倉庫
yum install centos-release-scl
編輯配置文件 /etc/yum.repos.d/zabbix.repo and enable zabbix-frontend repository.
[zabbix-frontend]
...
enabled=1
...
安裝Zabbix frontend packages
yum install zabbix-web-mysql-scl zabbix-nginx-conf-scl
安裝frontend時報錯

提示需要rh-php72-php-fpm��,rh-nginx116-nginx等軟件包。
解決方法:
因為之前沒有安裝centos-release-scl�����,所以導致出現上述問題�,配置好centos-extras倉庫后安裝即可
3.創建初始數據庫
# mysql -uroot -pxxxxx

mysql> create database zabbix character set utf8 collate utf8_bin;
mysql> create user zabbix@localhost identified by 'xxxxxxx';
mysql> grant all privileges on zabbix.* to zabbix@localhost;
mysql> quit;
導入初始架構和數據,系統將提示您輸入新創建的密碼�。
# zcat /usr/share/doc/zabbix-server-mysql*/create.sql.gz | mysql -uzabbix -p zabbix
4.為Zabbix server配置數據庫
編輯配置文件 /etc/zabbix/zabbix_server.conf
5.為Zabbix前端配置PHP
編輯配置文件 /etc/opt/rh/rh-nginx116/nginx/conf.d/zabbix.conf
##取消這兩行注釋
listen 80;
server_name example.com;
##同時把提供默認的web服務的配置注釋掉
vim /etc/opt/rh/rh-nginx116/nginx/nginx.conf
...
server {
        #listen       80 default_server;
        #listen       [::]:80 default_server;
        server_name  _;
...
##然后重啟服務
編輯配置文件 /etc/opt/rh/rh-php72/php-fpm.d/zabbix.conf, 在listen.acl_users指令這一行添加nginx用戶(在安裝rh-nginx116-nginx時系統會自動創建)
listen.acl_users = apache,nginx
##然后配置時區
php_value[date.timezone] = Asia/Shanghai
6.啟動zabbix server和agent進程��,并為它們設置開機自啟。
systemctl restart zabbix-server zabbix-agent rh-nginx116-nginx rh-php72-php-fpm
systemctl enable zabbix-server zabbix-agent rh-nginx116-nginx rh-php72-php-fpm
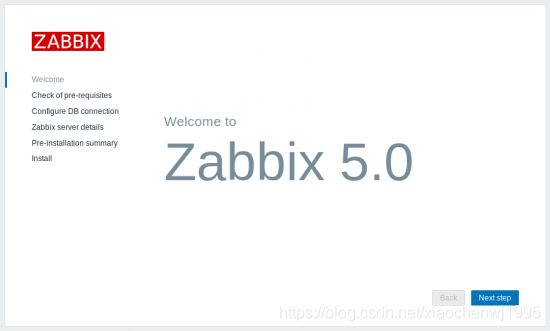
四���、配置Zabbix前端
在瀏覽器中 打開 Zabbix 前端URL:
對于 Apache:http://<server_ip_or_name>/zabbix
對于 Nginx:http://<server_ip_or_name>
檢查先決條件
確保滿足所有軟件先決條件。
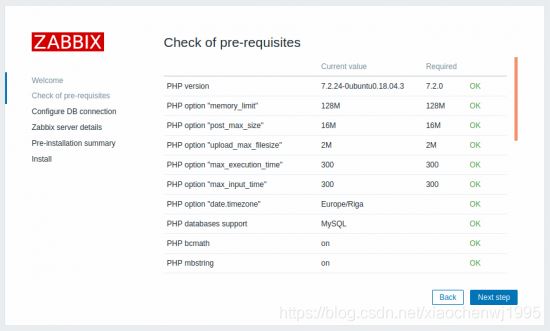
注意:如果需要更改Apache用戶或用戶組�,則必須驗證對會話文件夾的權限����。否則 Zabbix 安裝程序可能無法繼續��。
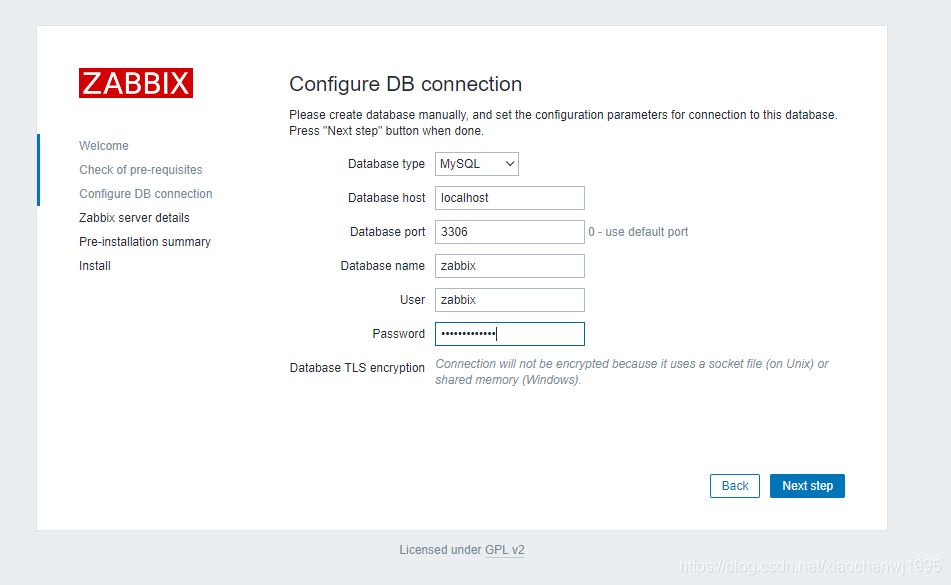
配置數據庫連接
輸入連接到數據庫的詳細信息����。Zabbix 數據庫必須已經創建
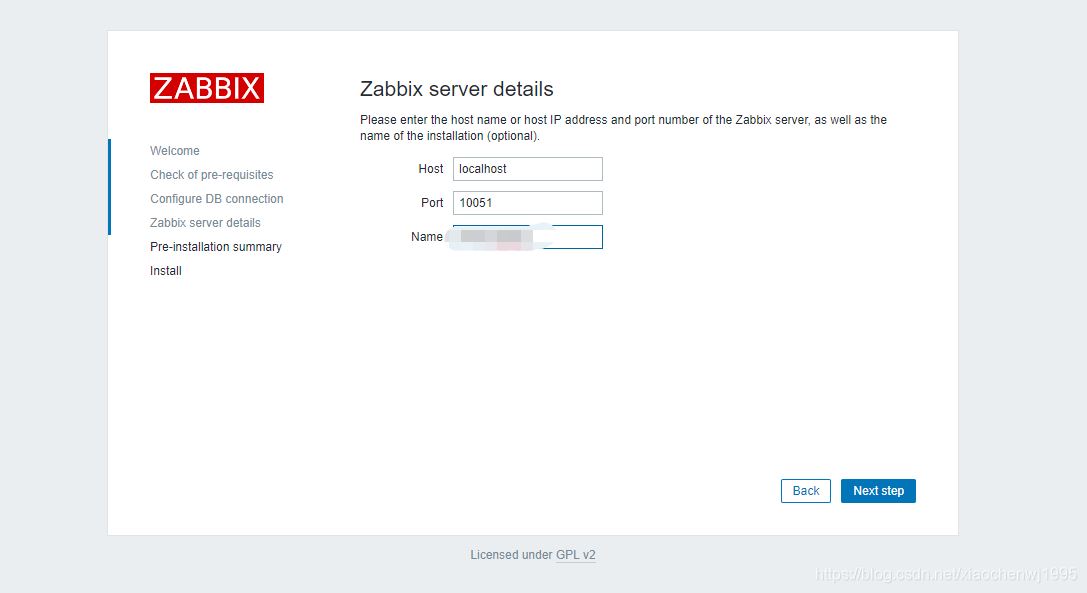
Zabbix 服務器詳細信息
輸入 Zabbix 服務器詳細信息���。輸入 Zabbix 服務器的名稱是可選的
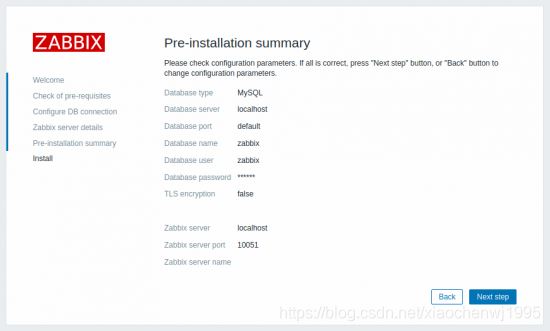
查看設置摘要�����。
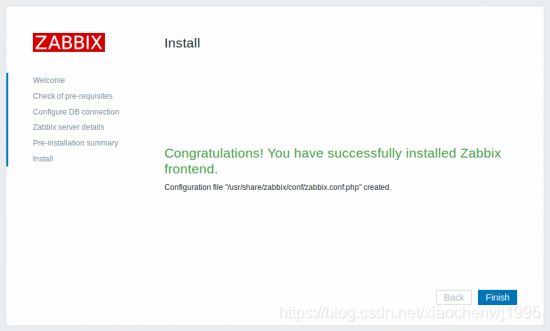
安裝完成
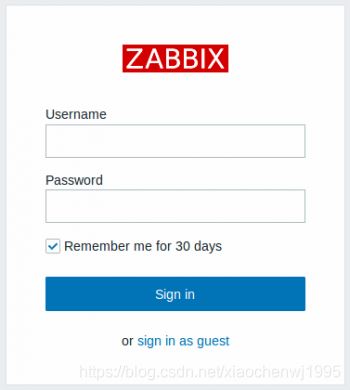
登錄
Zabbix 前端已準備就緒!默認用戶名為Admin,密碼為zabbix。

到此這篇關于centos7.9安裝zabbix5.0.14及配置過程的文章就介紹到這了,更多相關centos7.9安裝zabbix內容請搜索腳本之家以前的文章或繼續瀏覽下面的相關文章希望大家以后多多支持腳本之家!
