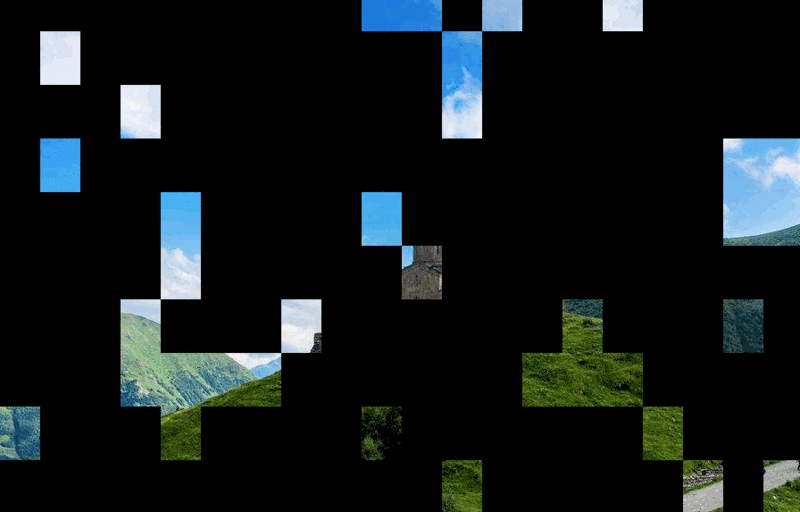
今天來實現一個圖片碎片化加載效果,效果如下:
我們分為 3 個步驟來實現:
定義html結構
這里只需要一個 canvas 元素就可以了。
<html>
  <body>
    <canvas
      id="myCanvas"
      width="900"
      height="600"
      style="background-color: black;"
    ></canvas>
  </body>
</html>
拆分圖片
這個例子中,我們將圖片按照 10 行 10 列的網格,拆分成 100 個小碎片,這樣就可以對每一個小碎片獨立渲染了。
let image = new Image();
image.src = "https://cdn.yinhengli.com/canvas-example.jpeg";
let boxWidth, boxHeight;
// 拆分成 10 行,10 列
let rows = 10,
  columns = 20,
  counter = 0;

image.onload = function () {
  // 計算每一行,每一列的寬高
  boxWidth = image.width / columns;
  boxHeight = image.height / rows;
  // 循環渲染
  requestAnimationFrame(animate);
};
requestAnimationFrame :告訴瀏覽器,你希望執行一個動畫,并且要求瀏覽器在下次重繪之前調用指定的回調函數更新動畫。
編寫動畫函數
接下來我們編寫動畫函數,讓瀏覽器在每一次重繪前,隨機渲染某個小碎片。
這里的核心是 context.drawImage 方法。
let canvas = document.getElementById("myCanvas");
let context = canvas.getContext("2d");

function animate() {
  // 隨機渲染某個模塊
  let x = Math.floor(Math.random() * columns);
  let y = Math.floor(Math.random() * rows);
  // 核心
  context.drawImage(
    image,
    x * boxWidth,  // canvas 中橫坐標起始位置
    y * boxHeight, // canvas 中縱坐標起始位置
    boxWidth,      // 畫圖的寬度(小碎片圖像的寬)
    boxHeight,     // 畫圖的高度(小碎片圖像的高)
    x * boxWidth,  // 從大圖的 x 坐標位置開始畫圖
    y * boxHeight, // 從大圖的 y 坐標位置開始畫圖
    boxWidth,      // 從大圖的 x 位置開始,畫多寬(小碎片圖像的寬)
    boxHeight      // 從大圖的 y 位置開始,畫多高(小碎片圖像的高)
  );
  counter++;
  // 如果模塊渲染了 90%,就讓整個圖片顯示出來。
  if (counter > columns * rows * 0.9) {
    context.drawImage(image, 0, 0);
  } else {
    requestAnimationFrame(animate);
  }
}
完整代碼
<html>
  <body>
    <canvas
      id="myCanvas"
      width="900"
      height="600"
      style="background-color: black;"
    ></canvas>
    <script>
      let image = new Image();
      image.src = "https://cdn.yinhengli.com/canvas-example.jpeg";
      let canvas = document.getElementById("myCanvas");
      let context = canvas.getContext("2d");
      let boxWidth, boxHeight;
      let rows = 10,
        columns = 20,
        counter = 0;

      image.onload = function () {
        boxWidth = image.width / columns;
        boxHeight = image.height / rows;
        requestAnimationFrame(animate);
      };

      function animate() {
        let x = Math.floor(Math.random() * columns);
        let y = Math.floor(Math.random() * rows);
        context.drawImage(
          image,
          x * boxWidth, // 橫坐標起始位置
          y * boxHeight, // 縱坐標起始位置
          boxWidth, // 圖像的寬
          boxHeight, // 圖像的高
          x * boxWidth, // 在畫布上放置圖像的 x 坐標位置
          y * boxHeight, // 在畫布上放置圖像的 y 坐標位置
          boxWidth, // 要使用的圖像的寬度
          boxHeight // 要使用的圖像的高度
        );
        counter++;
        if (counter > columns * rows * 0.9) {
          context.drawImage(image, 0, 0);
        } else {
          requestAnimationFrame(animate);
        }
      }
    </script>
  </body>
</html>
總結
通過這個 Demo,我們使用了 canvasAPI 實現了圖片的碎片加載效果,是不是特別簡單!
到此這篇關于基于HTML代碼實現圖片碎片化加載功能的文章就介紹到這了,更多相關html圖片碎片化加載內容請搜索腳本之家以前的文章或繼續瀏覽下面的相關文章,希望大家以后多多支持腳本之家!
